Every screen, in order.
The business side of Schedule Space, screen by screen: what each page is for and what every field and option does. The example business is a massage spa with three therapists; yours will show your own names, but the screens are the same.
Businesses
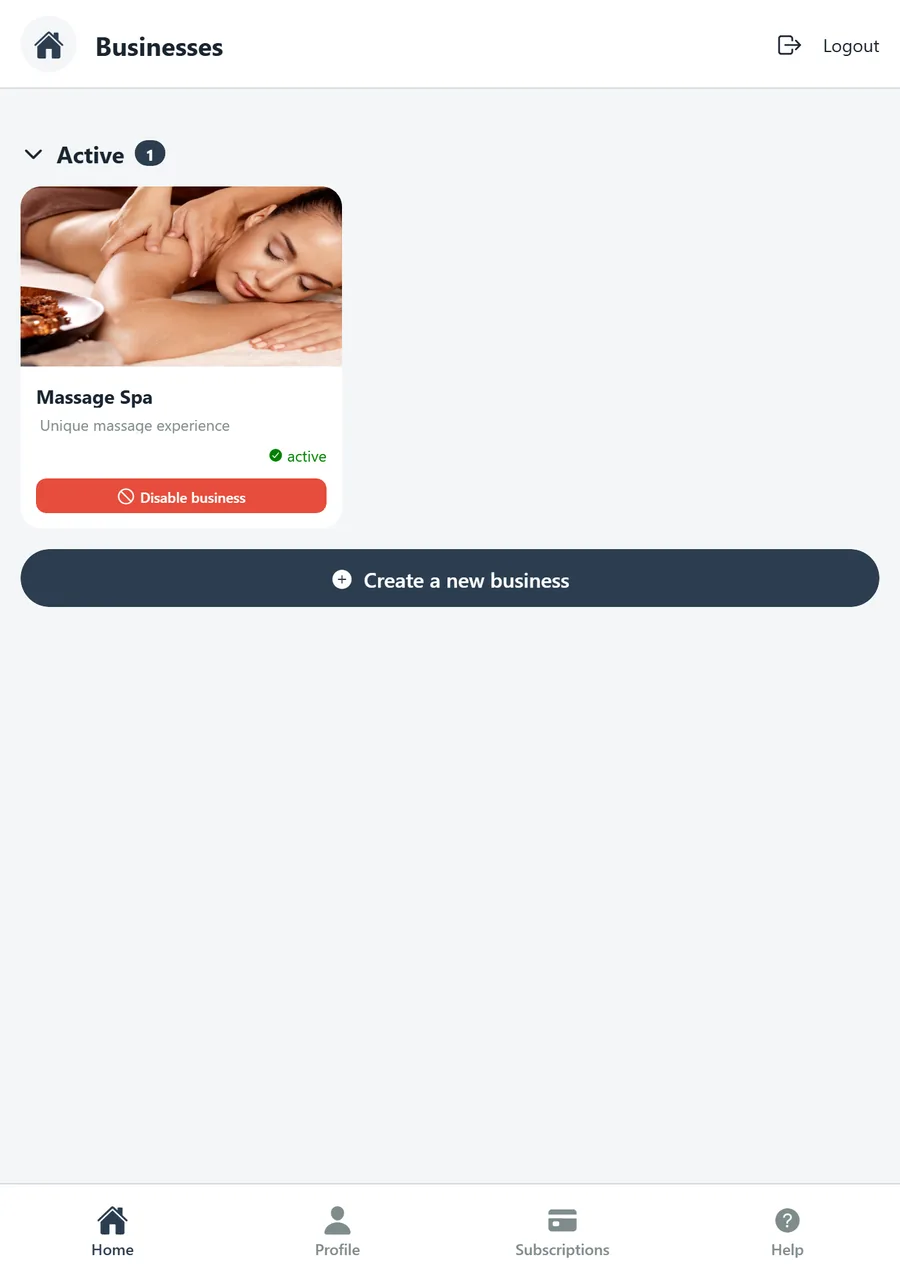
The first screen after signing in as a business. Every business on your account appears as a card, split into Active (live in the app and bookable) and Inactive (still being set up, or switched off). Tap a card to open that business.
- Active / Inactive — collapsible sections with a count. A new business starts in Inactive until you finish setup and activate it.
- Business card — the cover image, name, short description and status. Active cards also carry a Disable business button, which checks for future bookings, asks you to confirm, cancels them with refunds and moves the business to Inactive.
- Create a new business — starts a fresh business on the same account. Each business has its own profile, schedules, resources, services, people and calendar.
- Bottom bar — Home (this list), Profile (your own account), Subscriptions and Help are always one tap away. Logout is top right on every screen.
Business home
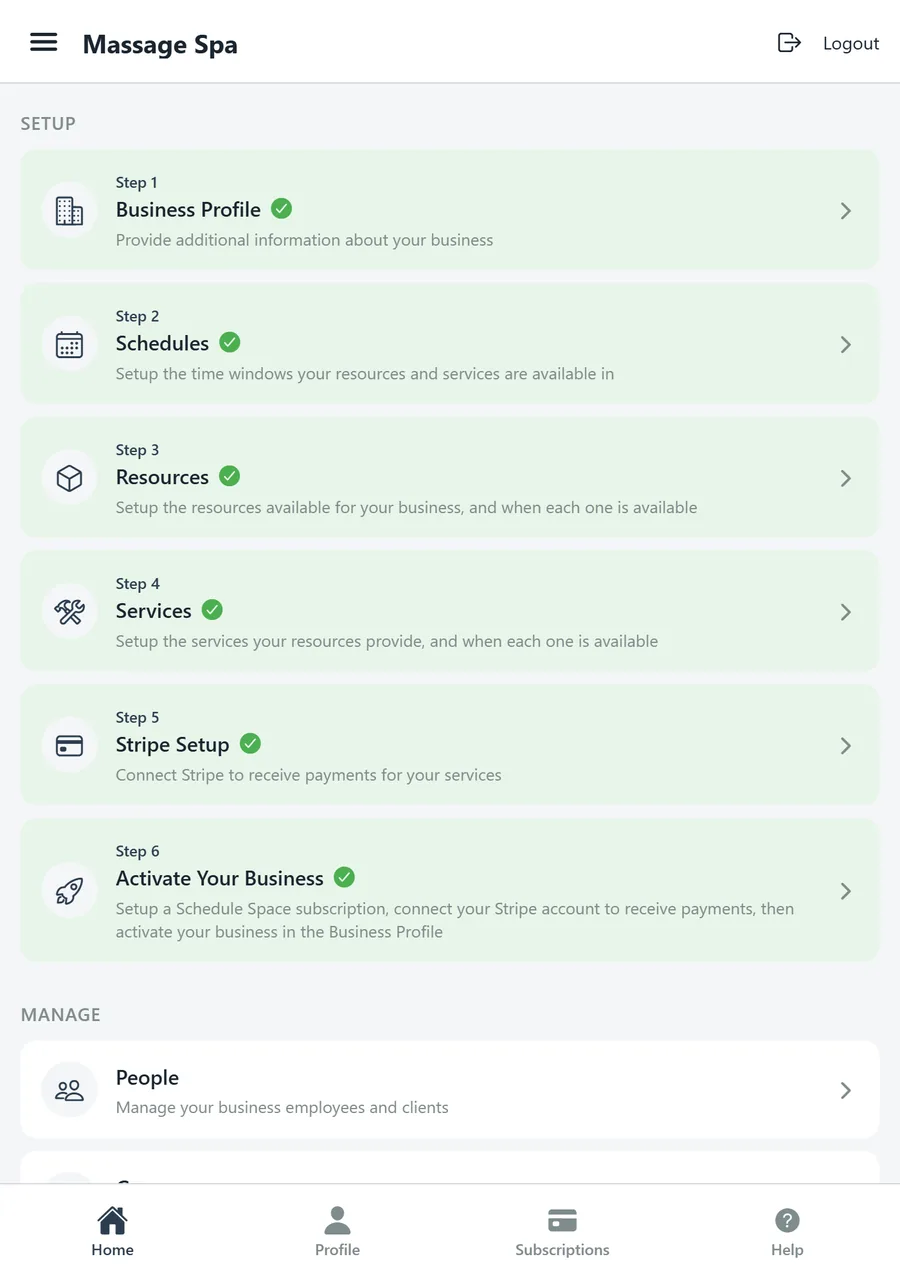
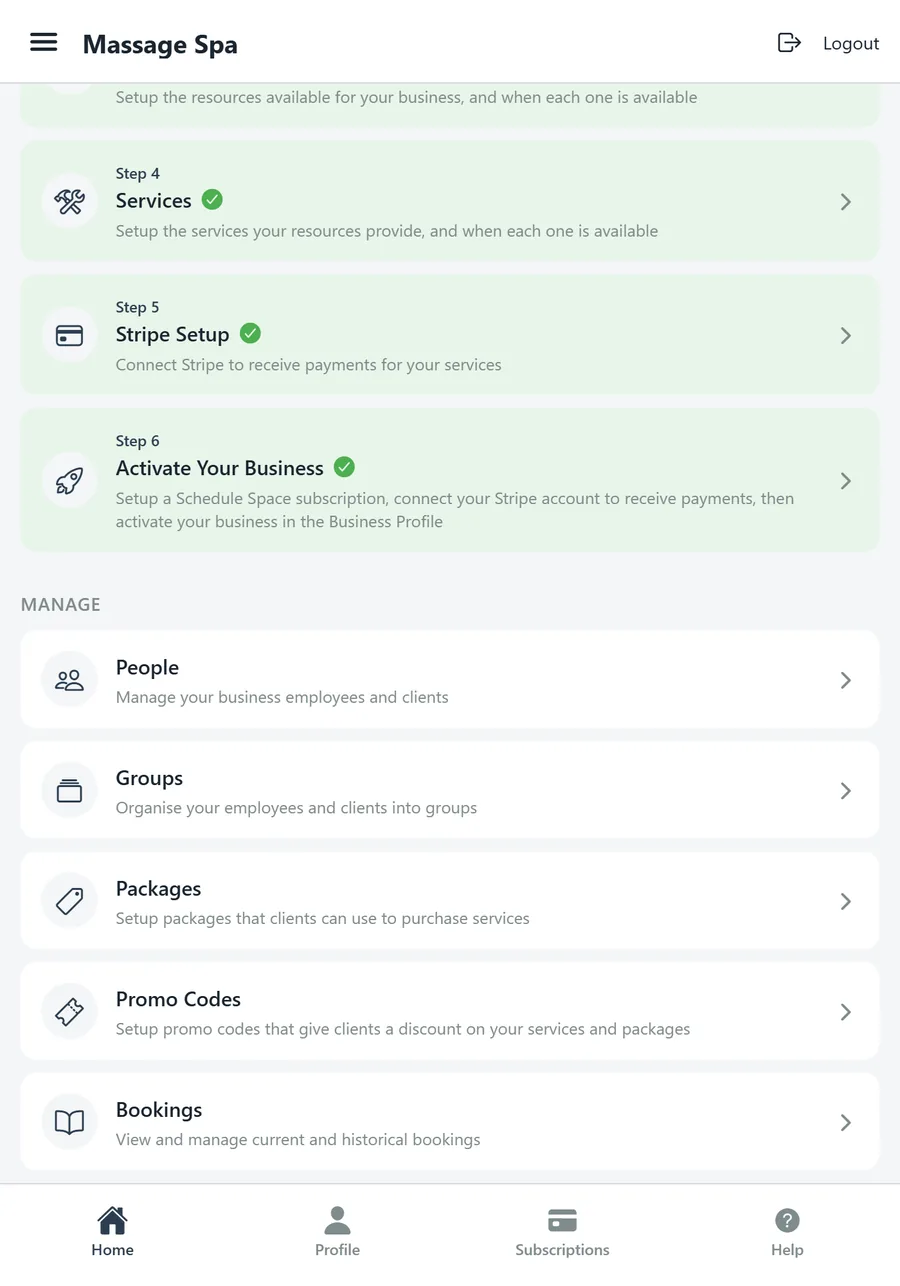
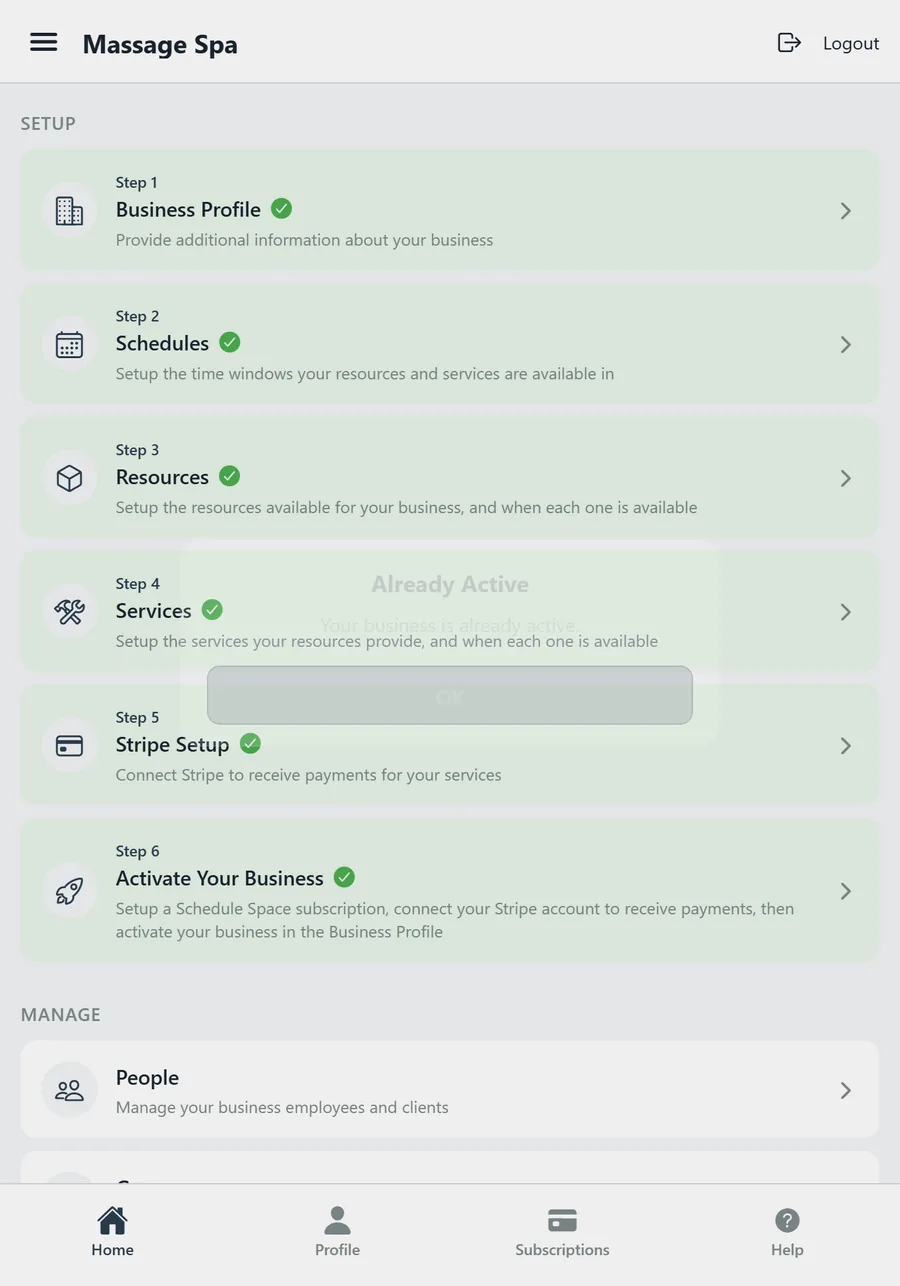
The hub for one business. It is split into Setup, the six steps that take you live, and Manage, the day-to-day tools. Each setup step shows a green tick once it is complete, so you can stop and come back without losing your place.
- Setup — Business Profile, Schedules, Resources, Services, Stripe Setup and Activate Your Business, in the order to do them. Each row states what the step is for.
- Manage — People (employees and clients), Groups, Packages, Promo Codes and Bookings.
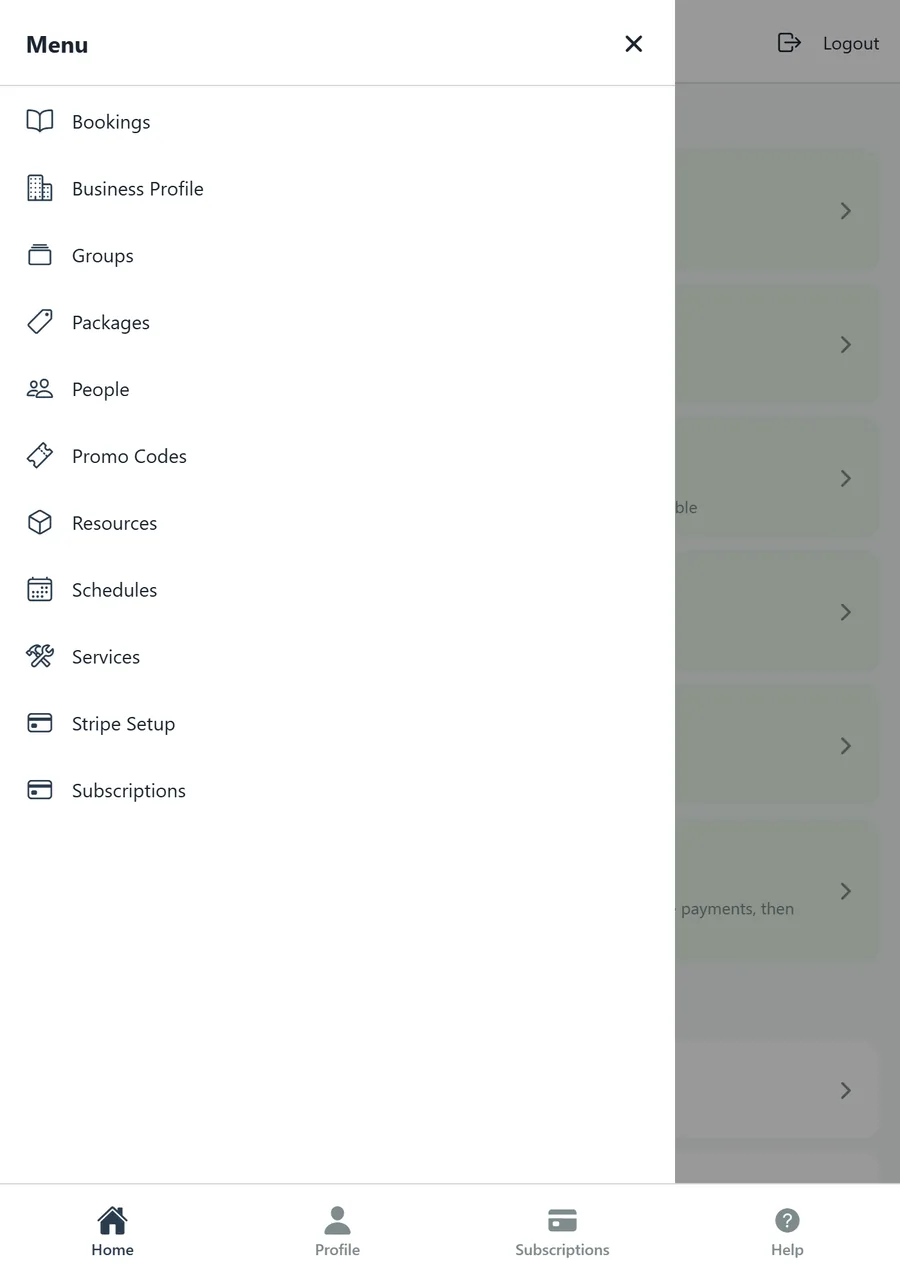
- Menu (top left) — a drawer with every business page in alphabetical order, so you can jump straight to Bookings or Services from anywhere in the business.
Step 1 · Business Profile
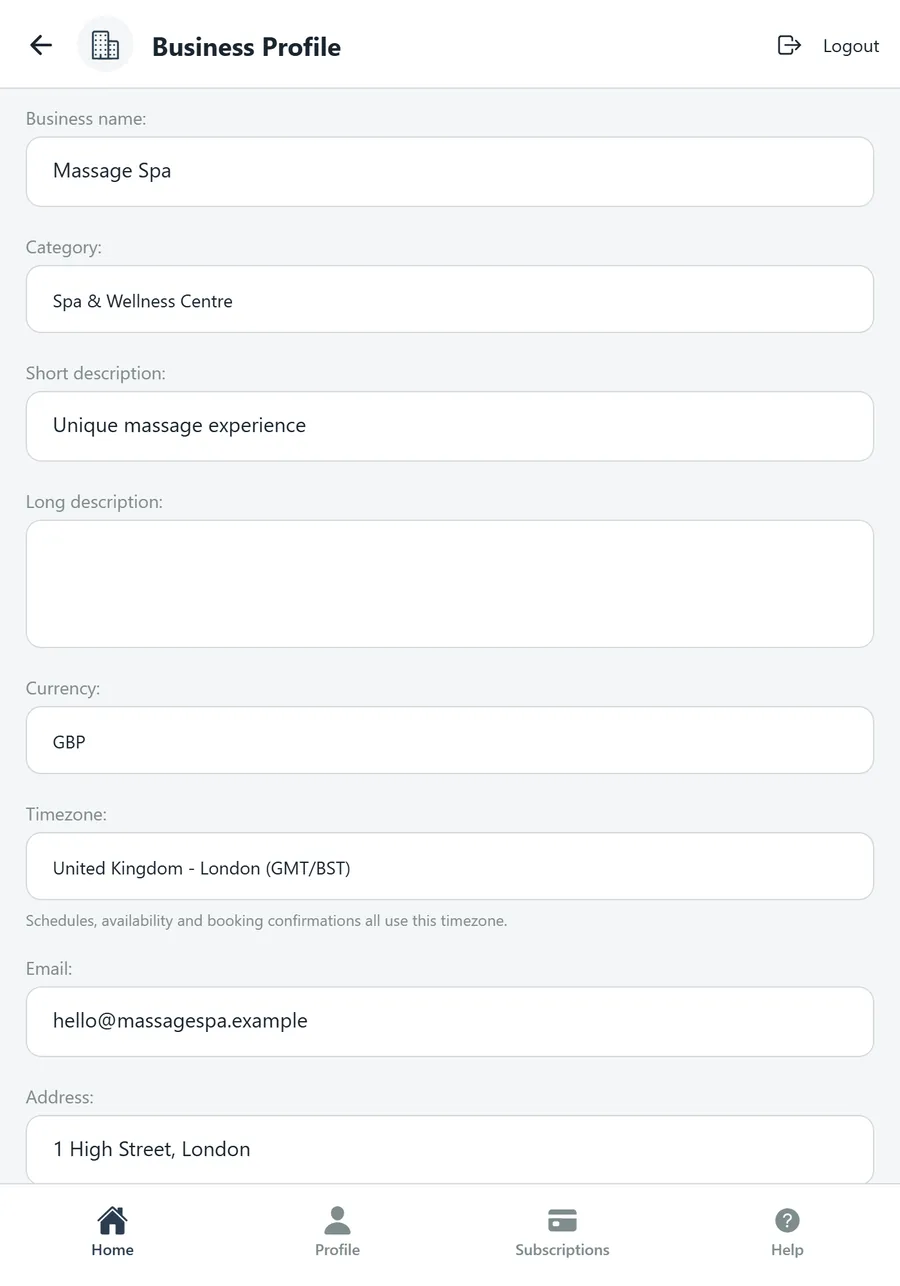
What clients see when they find you in the app, plus the settings that everything else hangs off: currency, timezone and whether the business is public. This is also where a business is switched on and off.
- Business name and Category — the name shown everywhere, and the kind of business (for example Spa & Wellness Centre). The category drives which service types are suggested in Step 4.
- Short description — one line under the name on your card. Long description — the full text on your listing.
- Currency — the currency every price is entered and charged in.
- Timezone — schedules, availability and booking confirmations all use this, and every calendar in the app states which timezone it is showing.
- Email, Address, Phone — your business contact details, shown to clients.
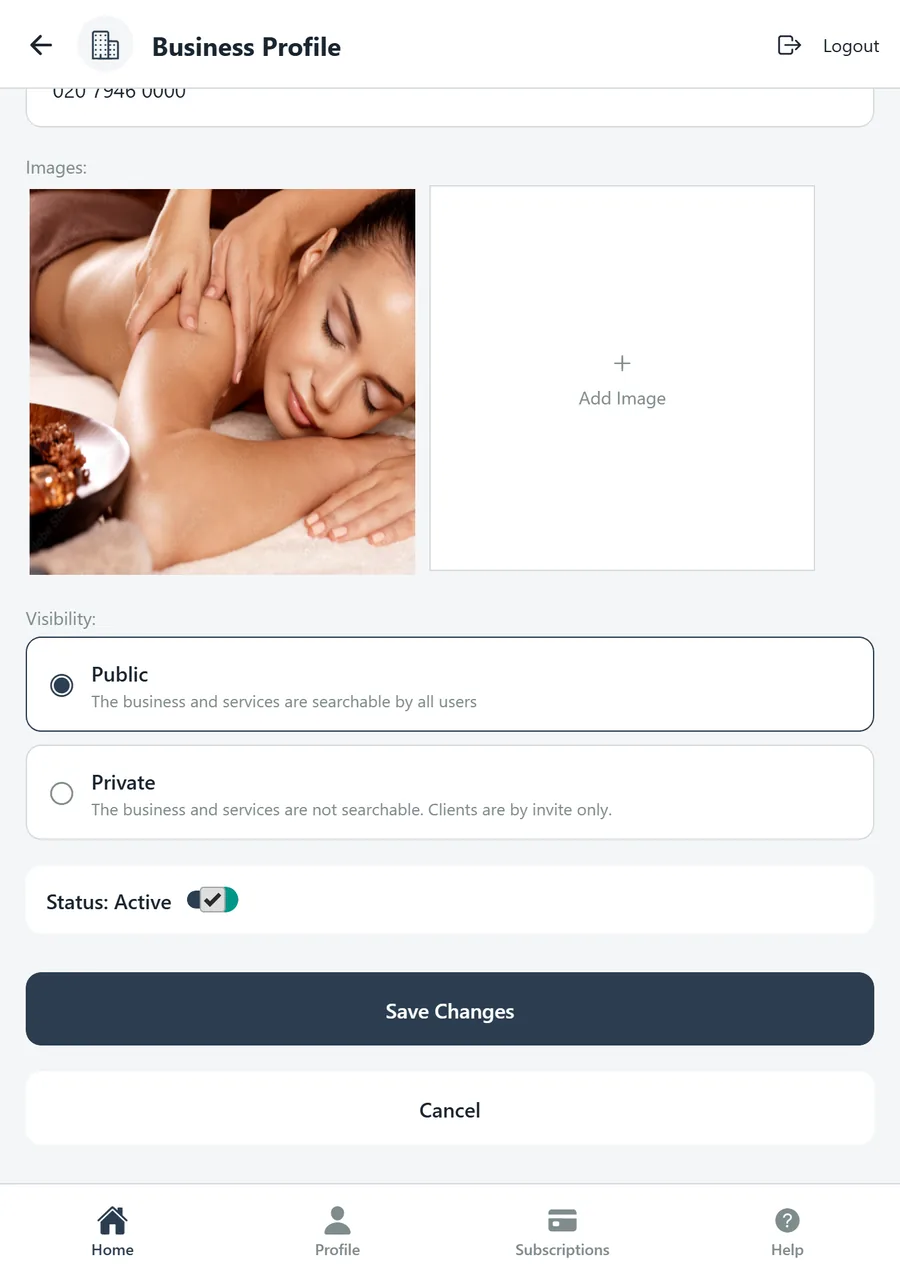
- Images — cover images for the card and listing. Add Image opens your photo library; images must be under 10 MB.
- Visibility — Public makes the business and its services searchable by every app user; Private hides it, so only clients you invite can book.
- Status — the Active switch. This is what Step 6 refers to: once your subscription and Stripe are in place, turn it on here to go live.
- Save Changes / Cancel — nothing is stored until you save.
Step 2 · Schedules
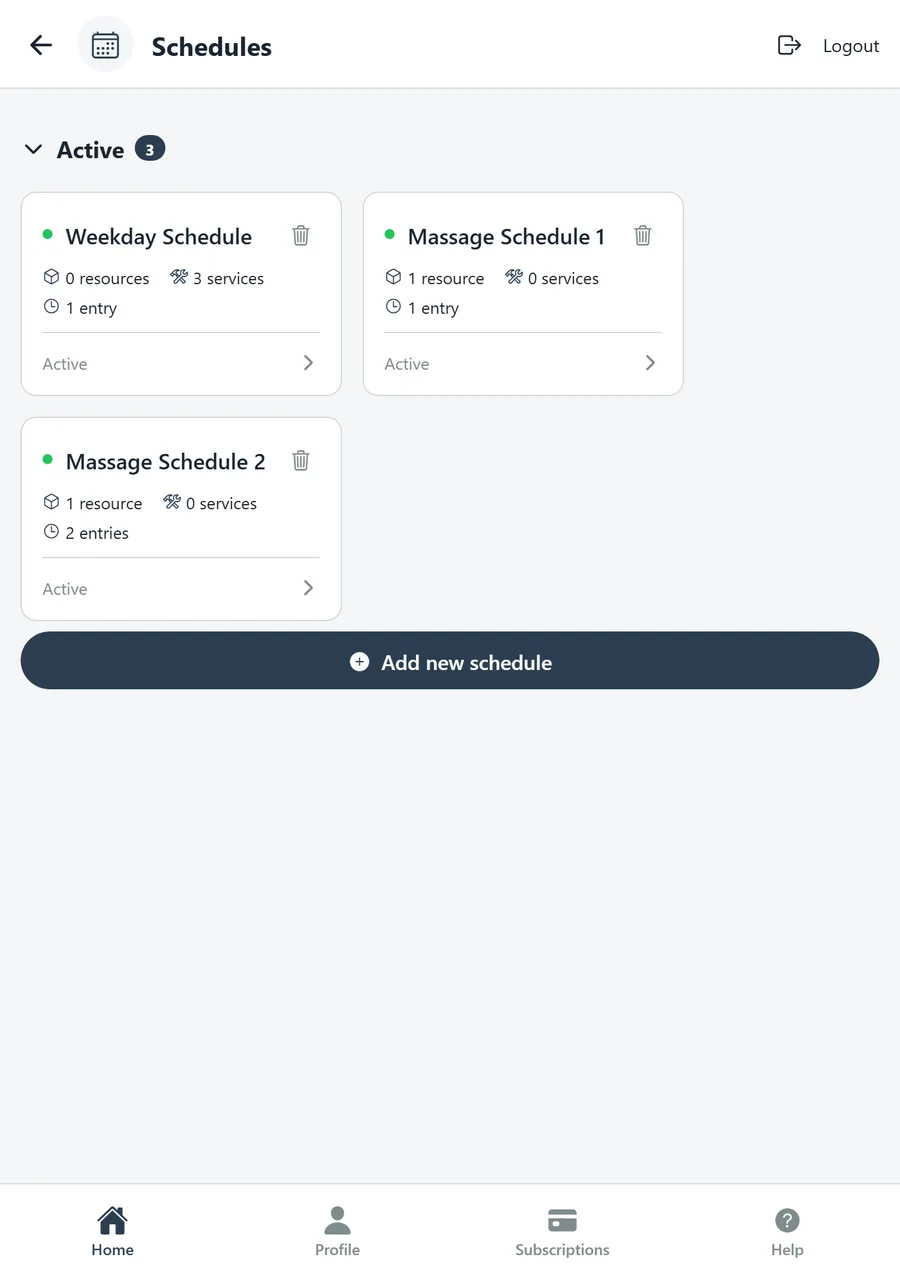
A schedule is a reusable set of time windows. You attach schedules to resources and services in the next two steps, so create one for each pattern you run, for example weekday daytime or a Saturday clinic, rather than one per person.
- Schedules list — each card shows how many resources and services use the schedule, how many entries it has, and its status. Tap a card to edit it; the bin icon deletes it.
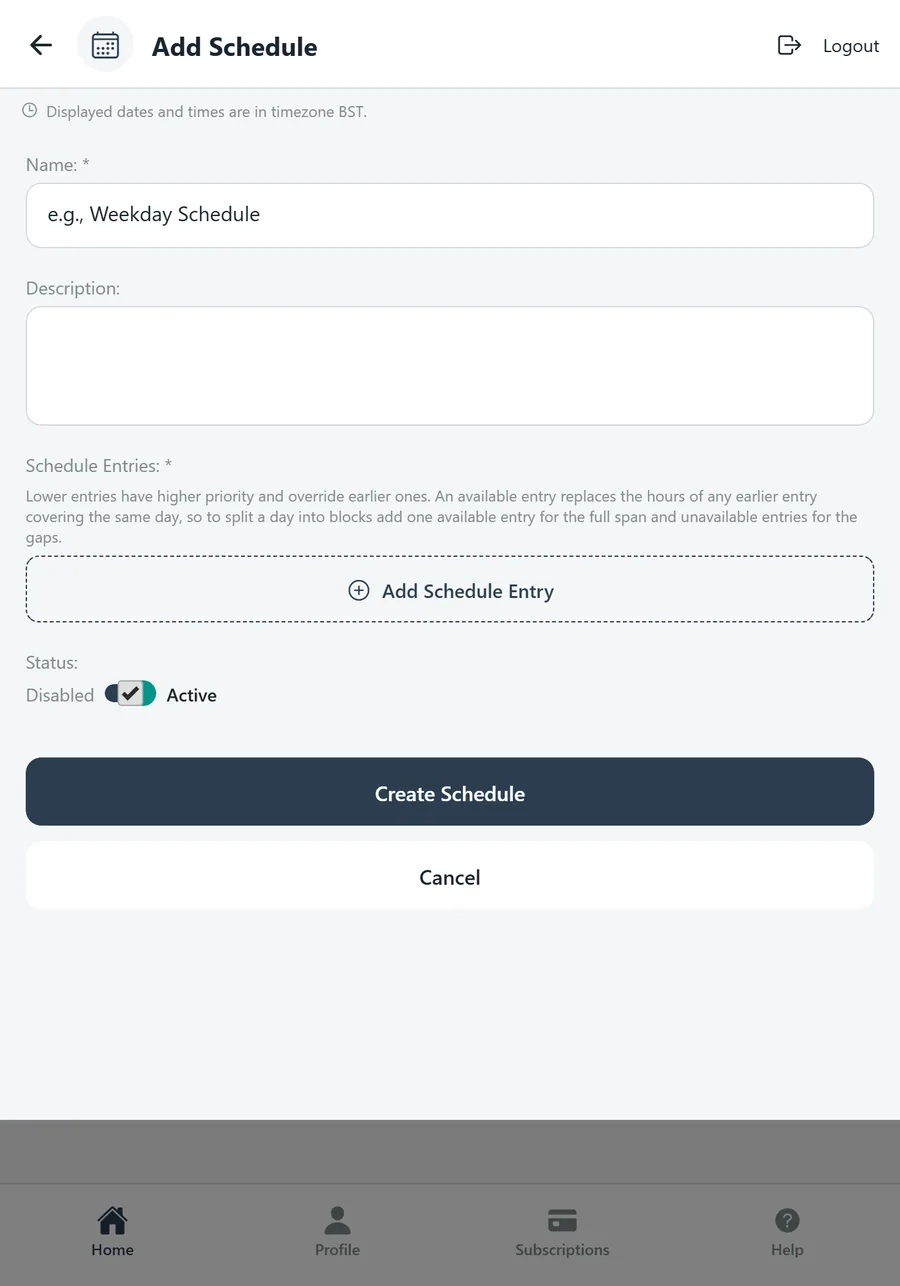
- Add new schedule — opens a blank schedule.
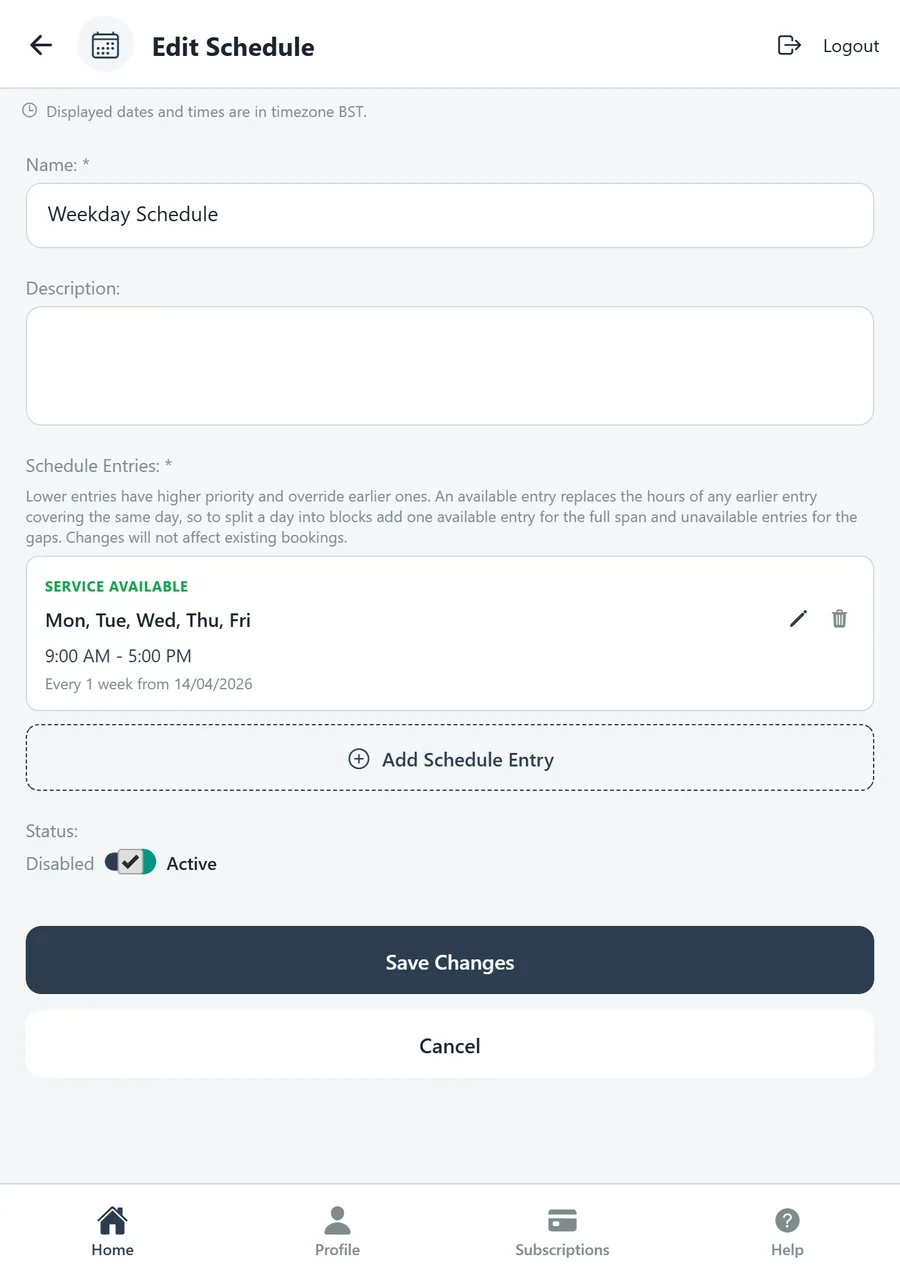
Add or edit a schedule
- Name (required) and Description — the name is what you pick from the dropdowns later.
- Schedule Entries (required) — the time blocks that make up the schedule. Lower entries have higher priority and override earlier ones: an available entry replaces the hours of any earlier entry covering the same day, so to split a day into blocks, add one available entry for the full span and unavailable entries for the gaps. Changes never affect existing bookings.
- Status — Active or Disabled. A disabled schedule stays saved but makes nothing available.
- Create Schedule / Save Changes.
Add Schedule Entry
- Availability — Service is available or Service is not available. Unavailable entries carve out breaks, holidays or a closed afternoon.
- Days of the Week — tap individual days, or use the shortcuts All Days, Business Days (Mon–Fri) and Weekends.
- Time Period — start and end time, with 9am–5pm and All Day shortcuts.
- Recurring every — repeat every 1, 2, 3… weeks.
- Start Date and End Date (optional) — when the pattern begins and, if you like, when it stops. Leave the end date empty for an ongoing pattern.
Step 3 · Resources
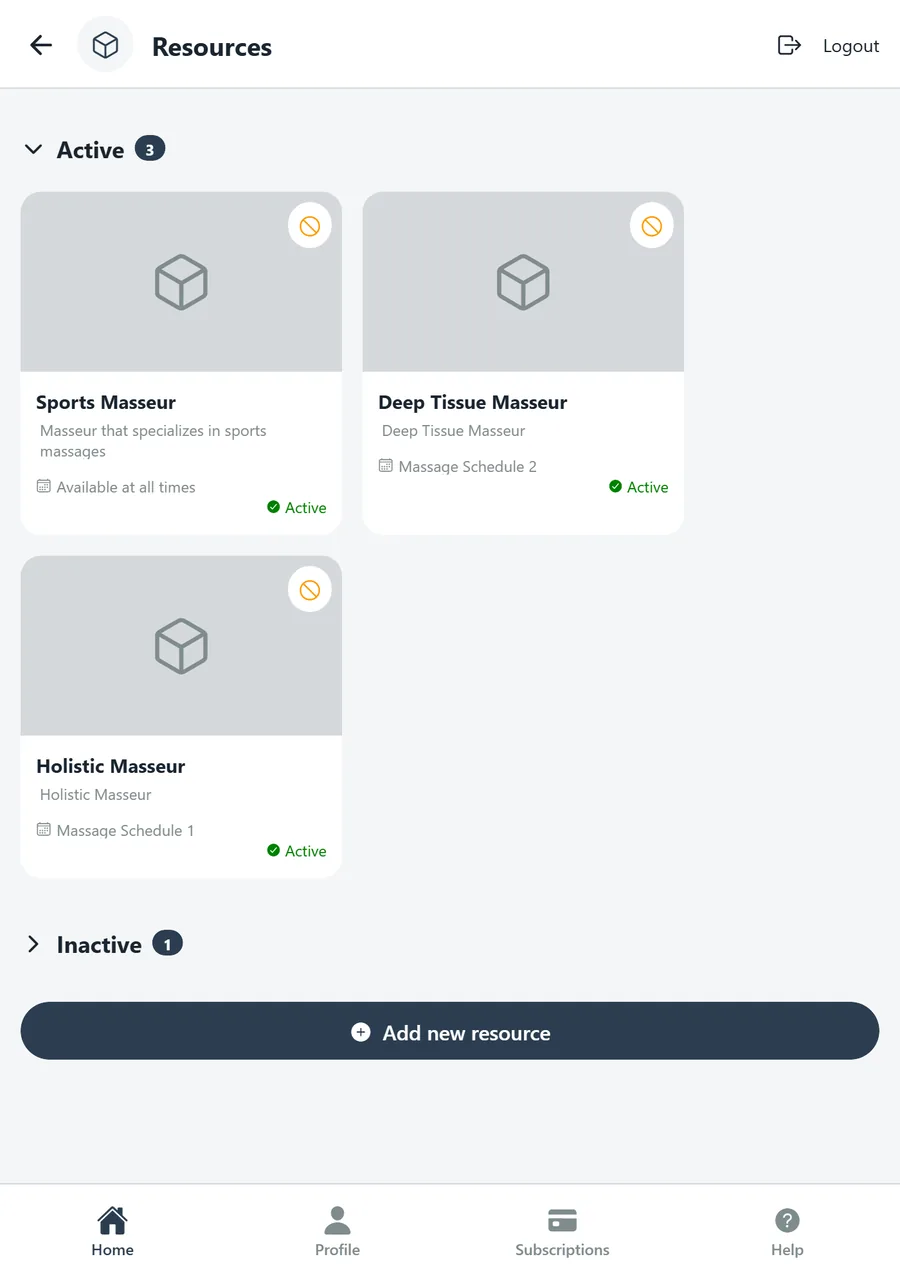
A resource is whatever a booking occupies: a therapist, a treatment room, a gym floor, a chair. Services run on resources, and the calendar shows bookings against them. Two things that can be booked at the same time are two resources.
- Resources list — Active and Inactive sections. Each card shows the name, description, the schedule it follows (or "Available at all times") and its status. Tap to edit; the circled icon in the corner disables the resource. A resource cannot be disabled while it is the only active resource for a service.
- Add new resource — opens the same form, blank.
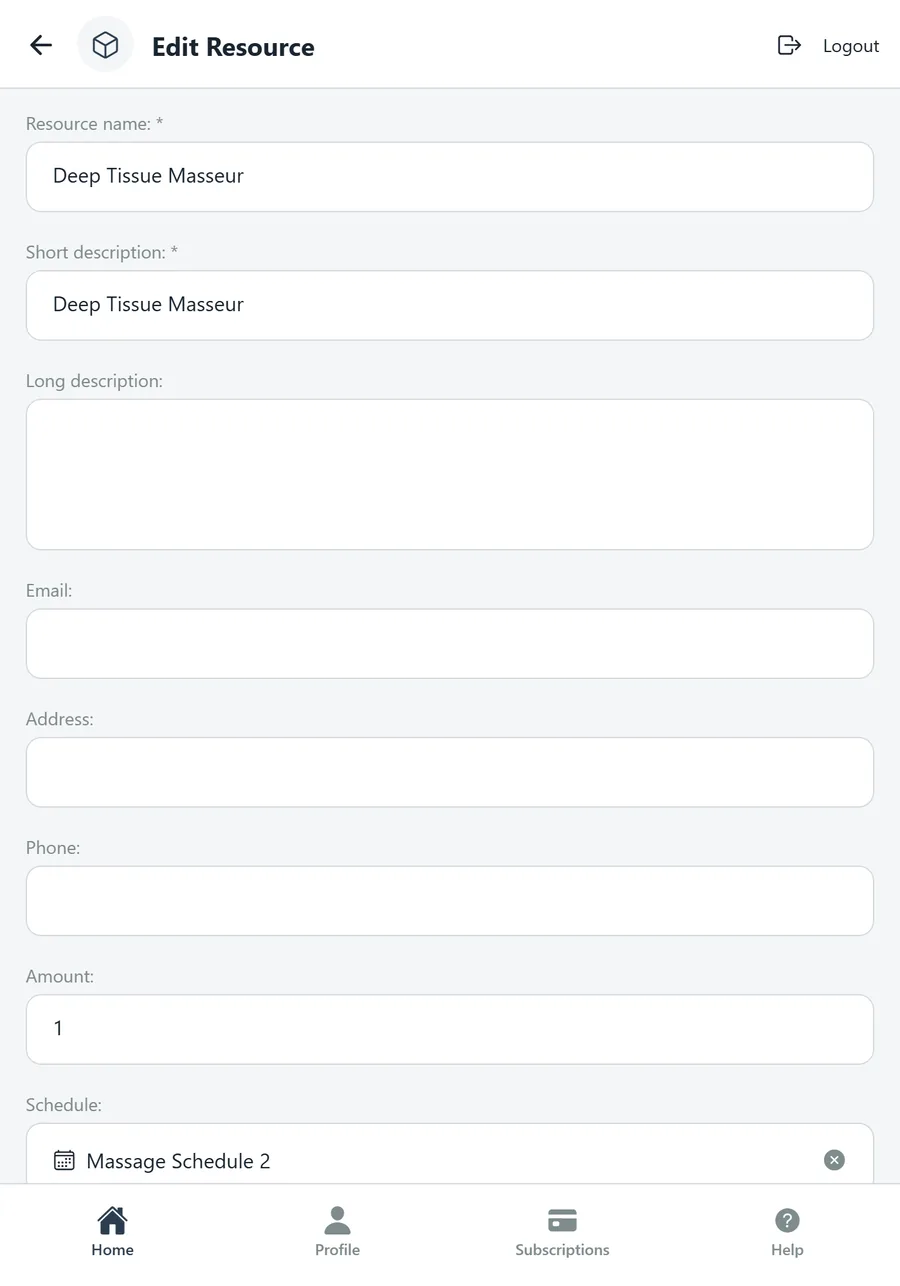
Add or edit a resource
- Resource name and Short description (both required), plus an optional Long description.
- Email, Address, Phone — optional contact details for this particular resource, useful when a therapist or a second site has its own.
- Amount — how many of this resource exist. Set 3 for three identical massage tables and the app lets three bookings overlap.
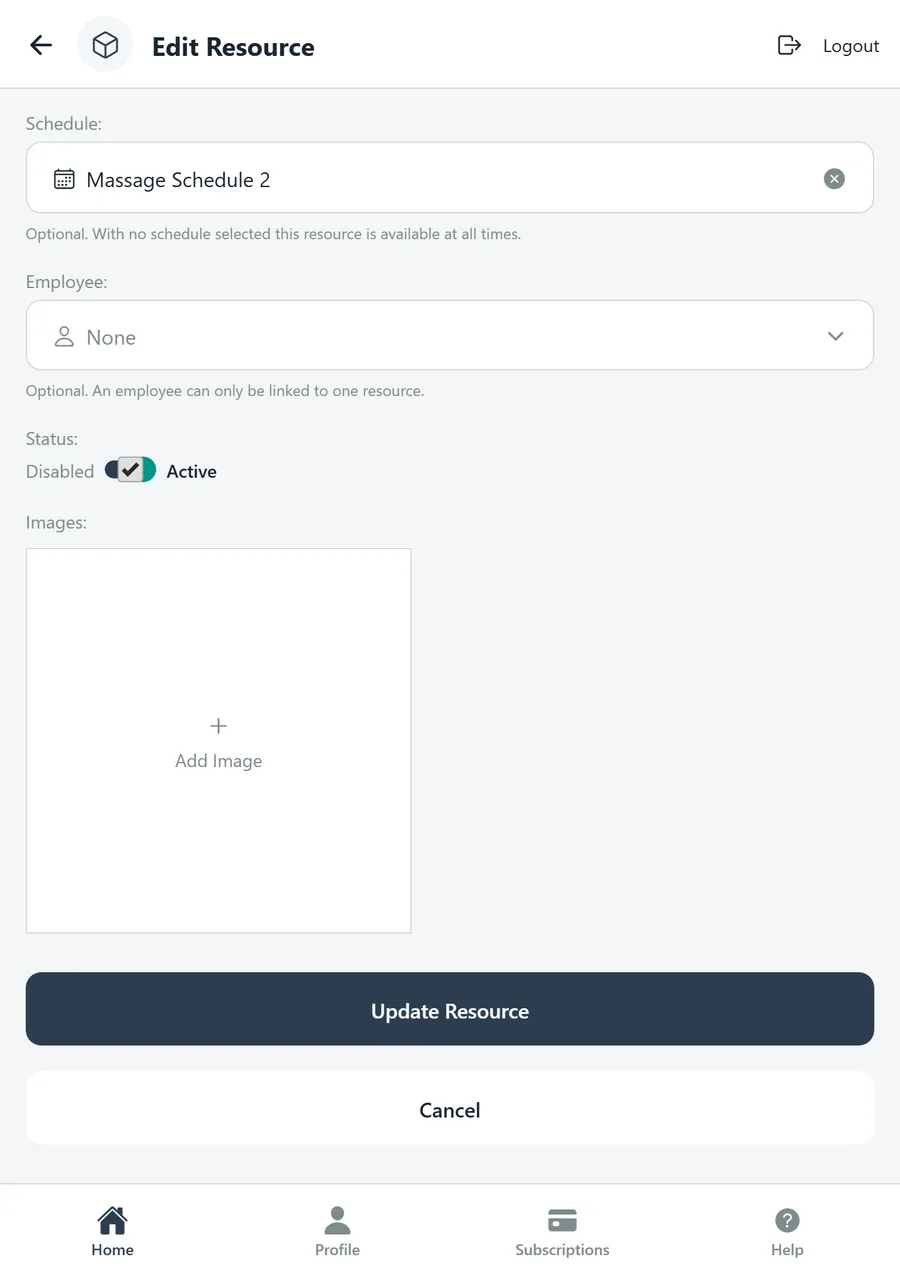
- Schedule — optional. Pick one of your schedules; with none selected the resource is available at all times.
- Employee — optional. Link the resource to a member of staff so their bookings and permissions line up. An employee can only be linked to one resource.
- Status — Active or Disabled.
- Images — a photo for the resource, shown to clients when they choose it.
Step 4 · Services
Services are what clients actually book: a 60-minute massage, a personal training session, a group class. Each service knows which resources can provide it, how long it takes, how it is paid for and how many people can attend.
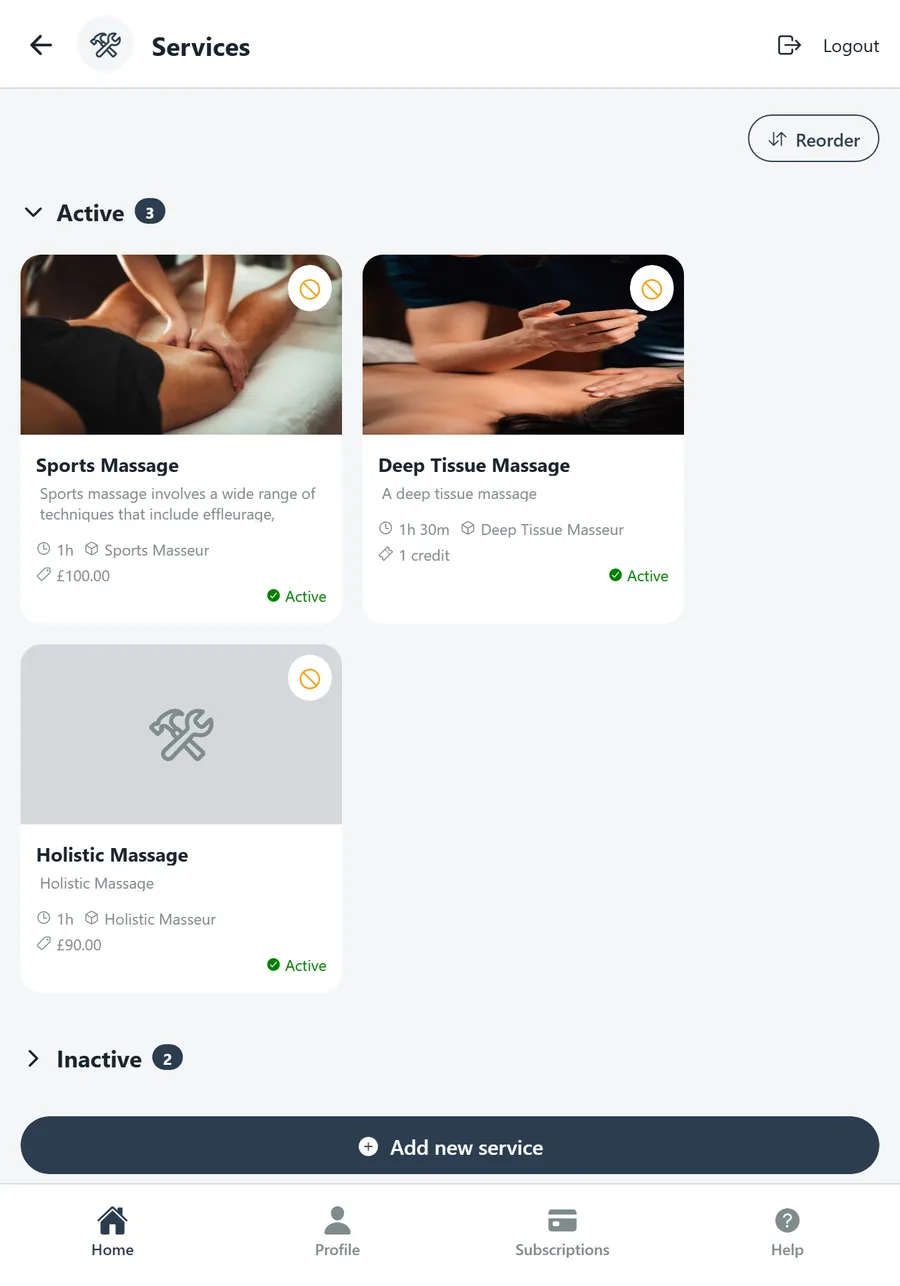
- Services list — cards show the image, description, duration, the resources it runs on, and either the price or the number of package credits it costs. Reorder (top right) lets you drag services into the order clients see them.
- Add new service — opens the form below.
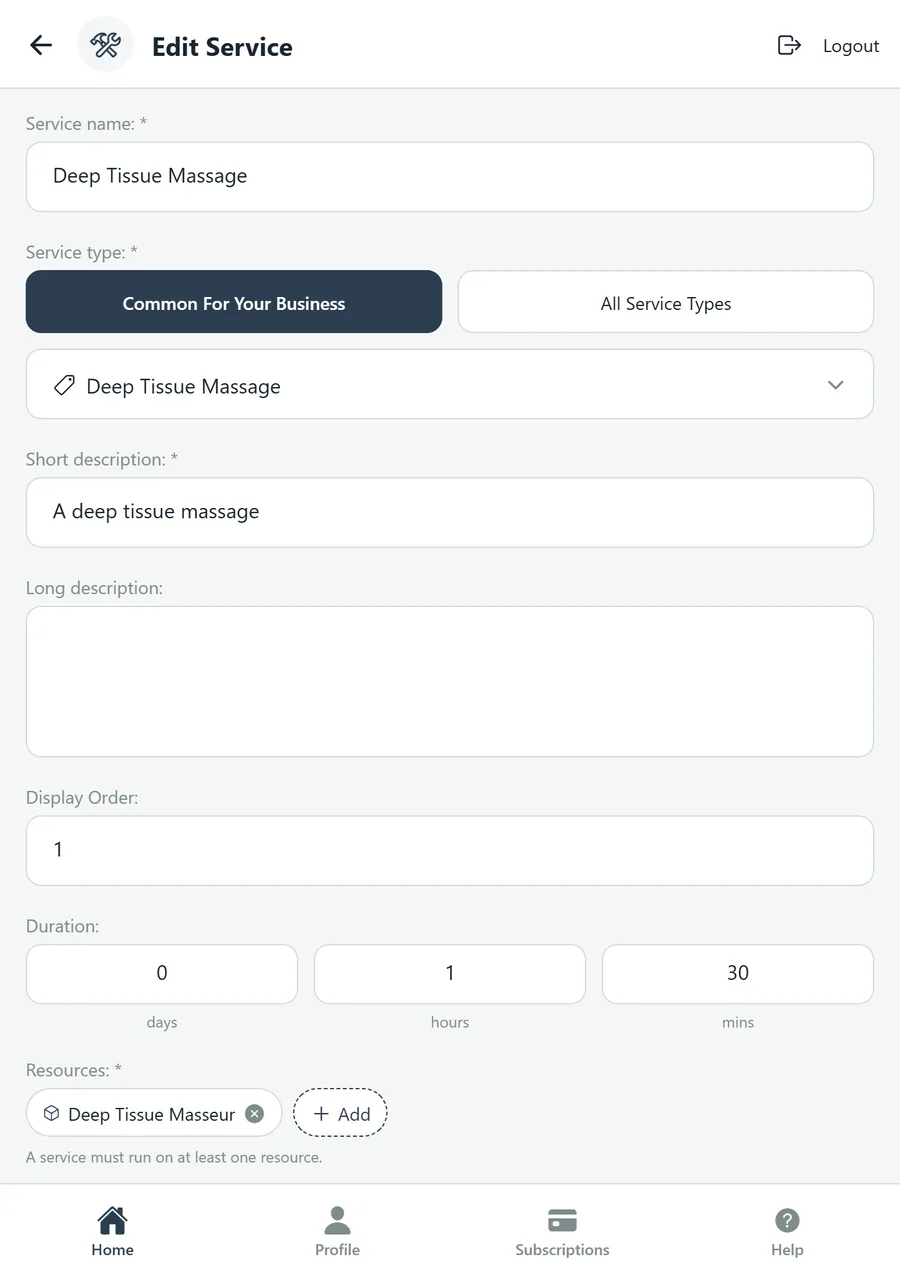
Add or edit a service
- Service name (required).
- Service type (required) — pick from Common For Your Business (types that match your category) or All Service Types. The type helps clients find you when they search.
- Short description (required) and Long description.
- Display Order — position in the list; Reorder on the previous screen changes the same value.
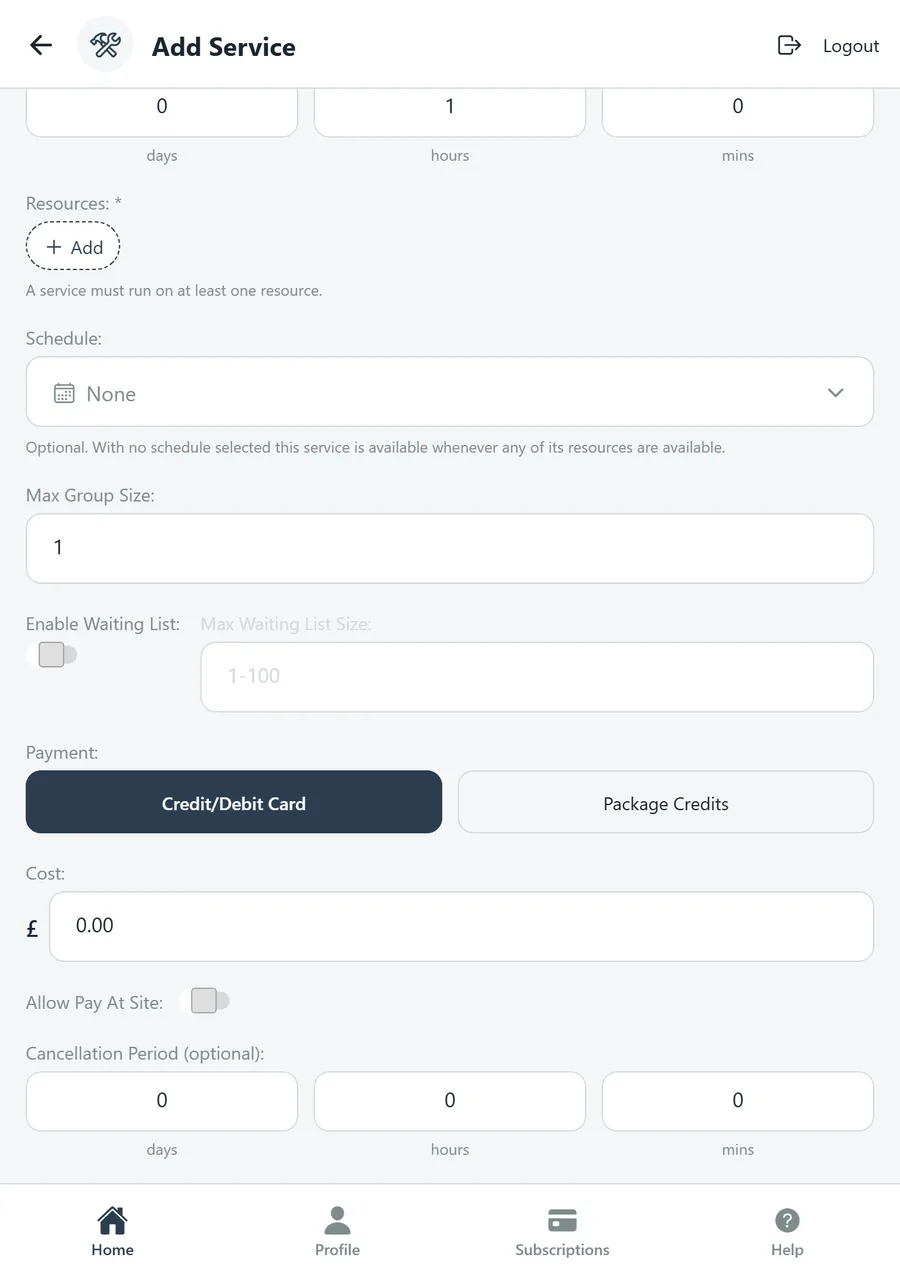
- Duration — days, hours and minutes. This sets the length of each booking slot.
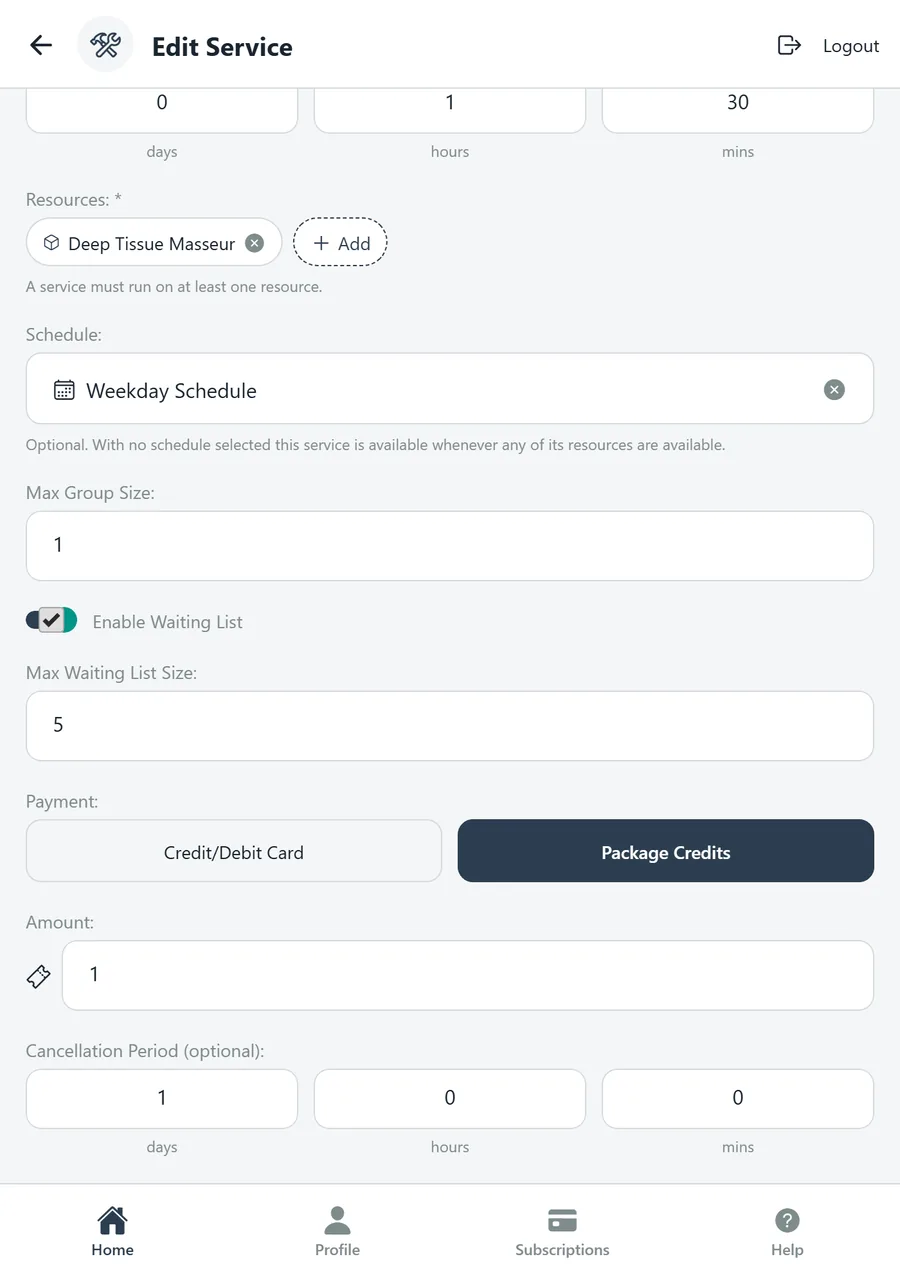
- Resources (required) — tap Add and choose every resource that can provide this service. A service must run on at least one resource.
- Schedule — optional. With none selected the service is available whenever any of its resources are available; choose a schedule to narrow it, for example evening classes only.
- Max Group Size — 1 for a one-to-one appointment; higher for a class. Enable Waiting List and Max Waiting List Size let clients queue for a full slot and be offered the place when someone cancels.
- Payment — Credit/Debit Card shows a Cost in your currency plus an Allow Pay At Site switch so clients can pay in person instead. Package Credits makes the service bookable only with a package and asks for the Amount of credits it uses.
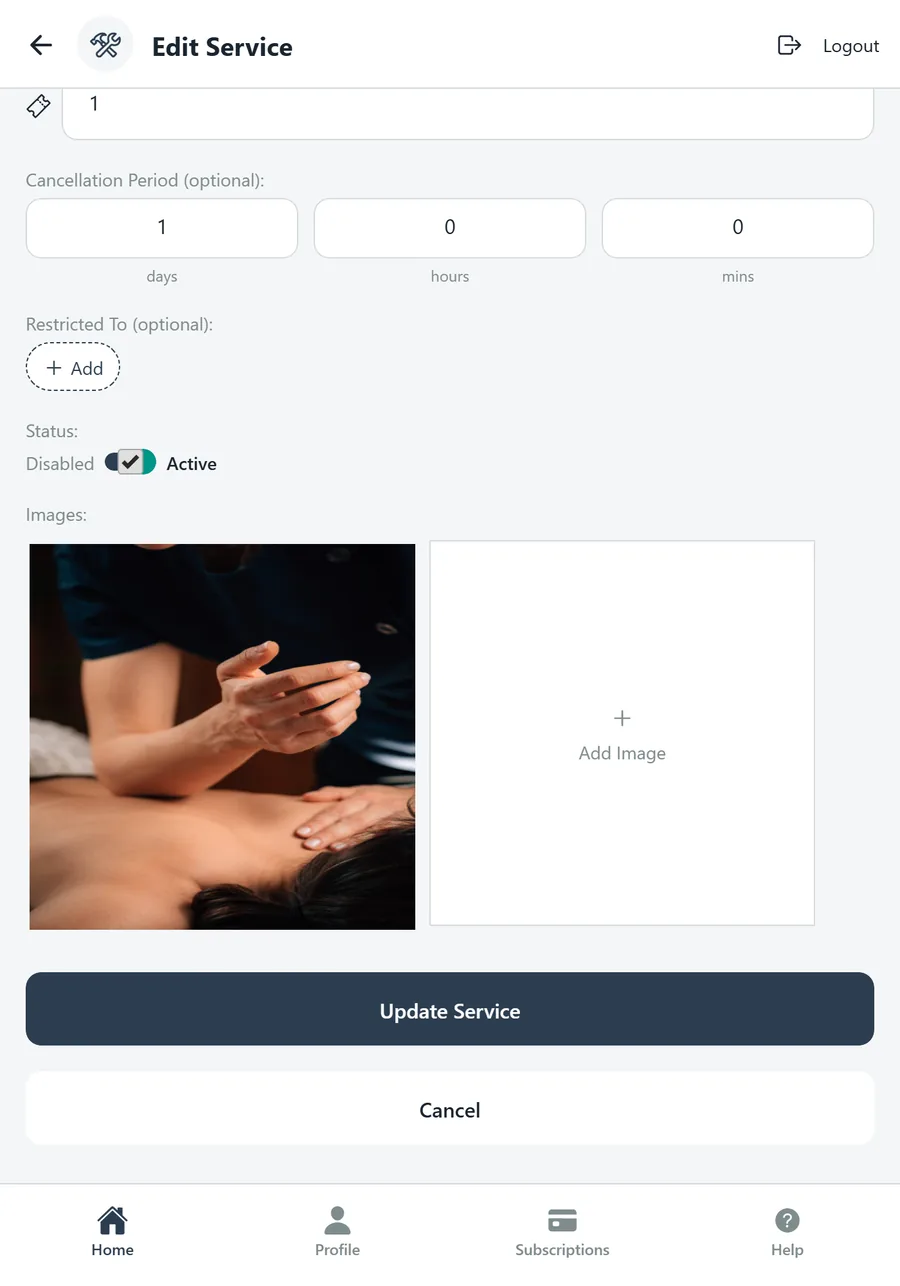
- Cancellation Period (optional) — how long before the start a client can still cancel or amend themselves (days, hours, minutes).
- Restricted To (optional) — limit the service to particular clients or groups, for example members only.
- Status and Images — as for resources.
Step 5 · Stripe Setup
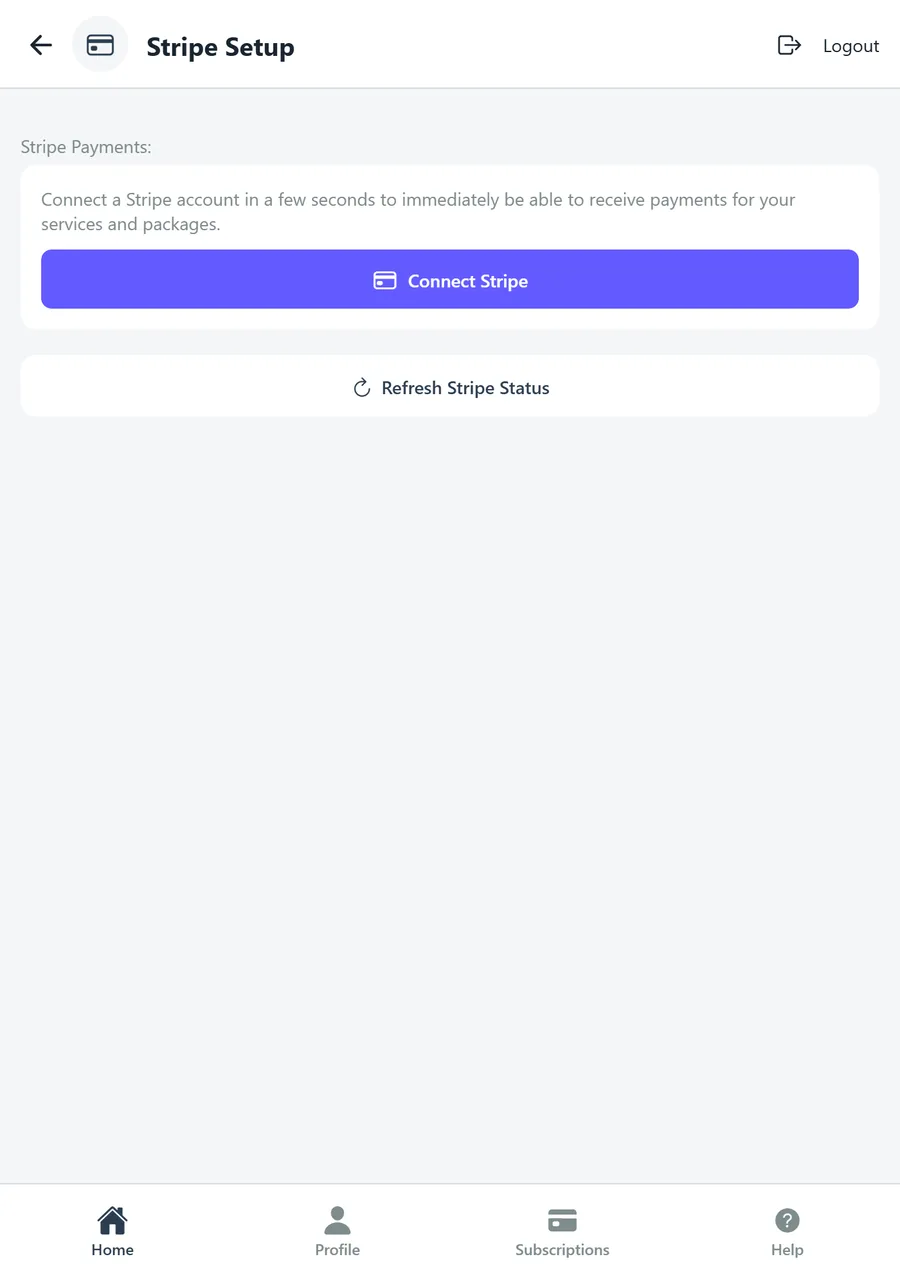
Stripe handles card payments for services and packages and pays out to your bank. You connect it once per business.
- Connect Stripe — takes you to Stripe to link an existing account or create one in a few seconds. Online payments are available as soon as it completes.
- Refresh Stripe Status — re-checks the connection if you finished on Stripe's side and the screen has not updated yet.
Step 6 · Activate Your Business
Going live needs three things: a Schedule Space subscription, a connected Stripe account, and the Status switch in Business Profile turned on. Tapping this step takes you to Subscriptions if you do not have a plan yet; on a business that is already live it simply tells you so.
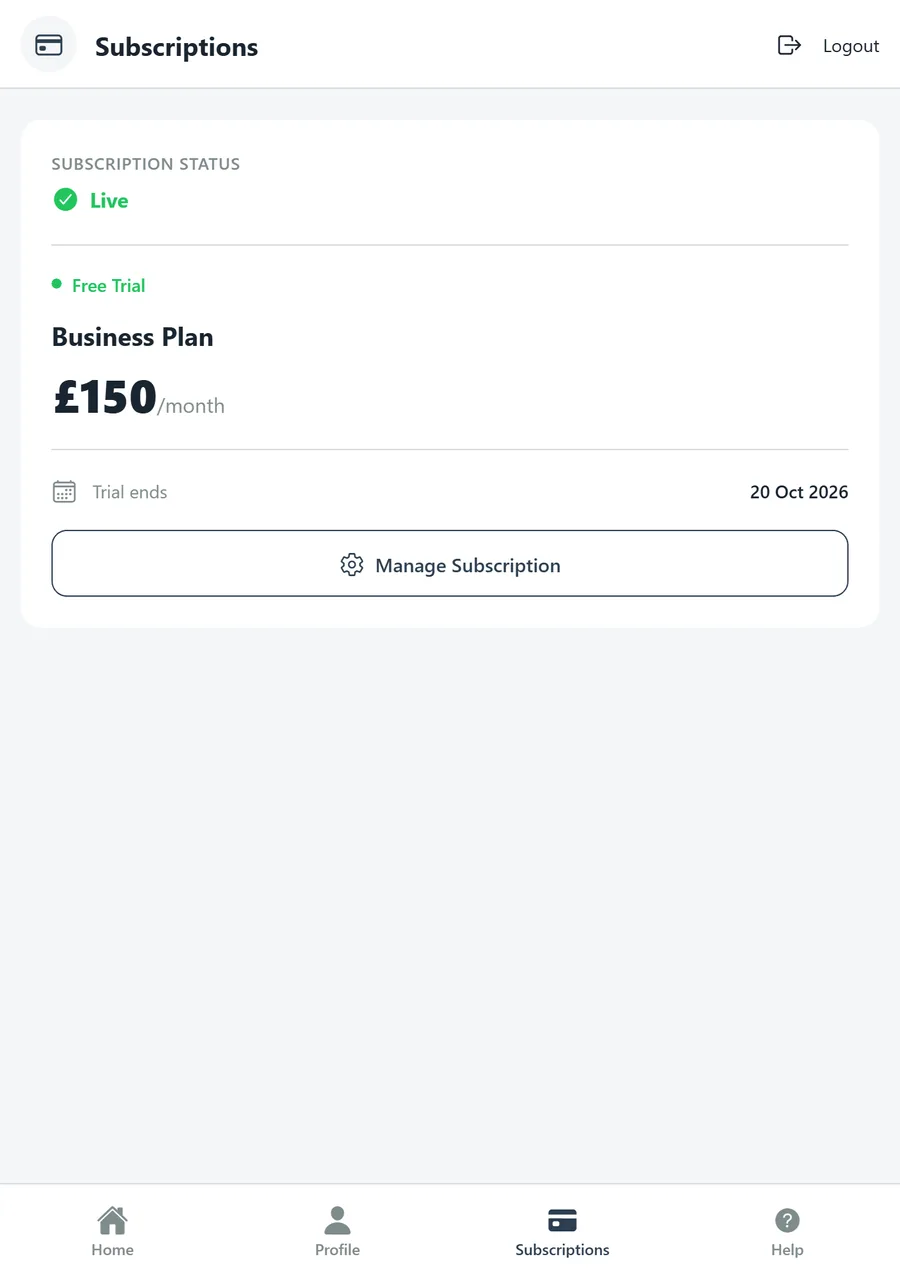
- Subscriptions — shows your subscription status (Live once a plan is in place), the plan (Business Plan, £150 a month), whether you are in the free trial and when it ends, then the next billing date. Start Free Trial appears on a new account and Manage Subscription once you are subscribed. The same screen is on the bottom bar at any time.
- Then — open Business Profile and switch Status to Active. Your services are searchable in the app from that moment.
People
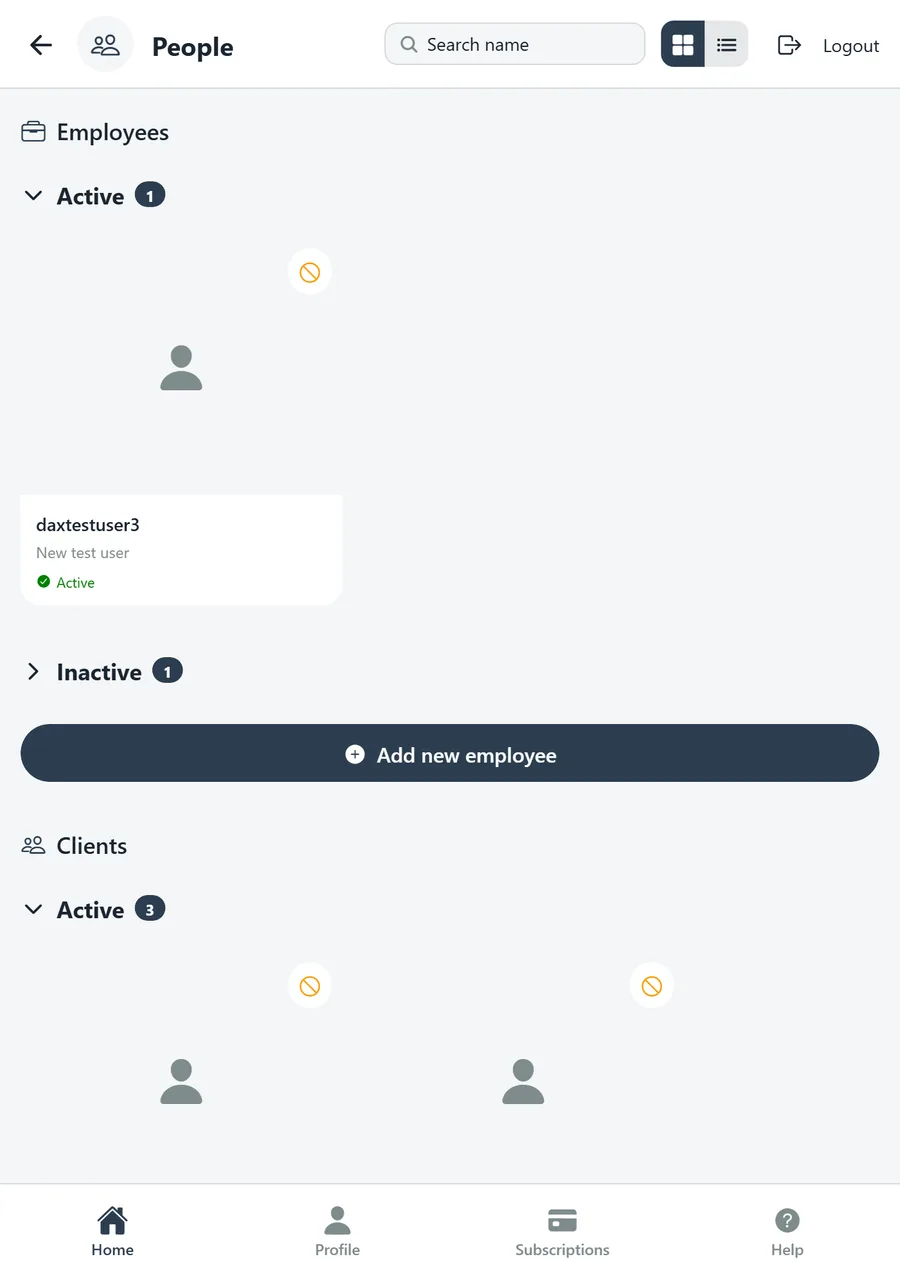
Everyone attached to the business: Employees (your team) and Clients. Each group has Active and Inactive sections, a search box, and a grid-or-list toggle in the header.
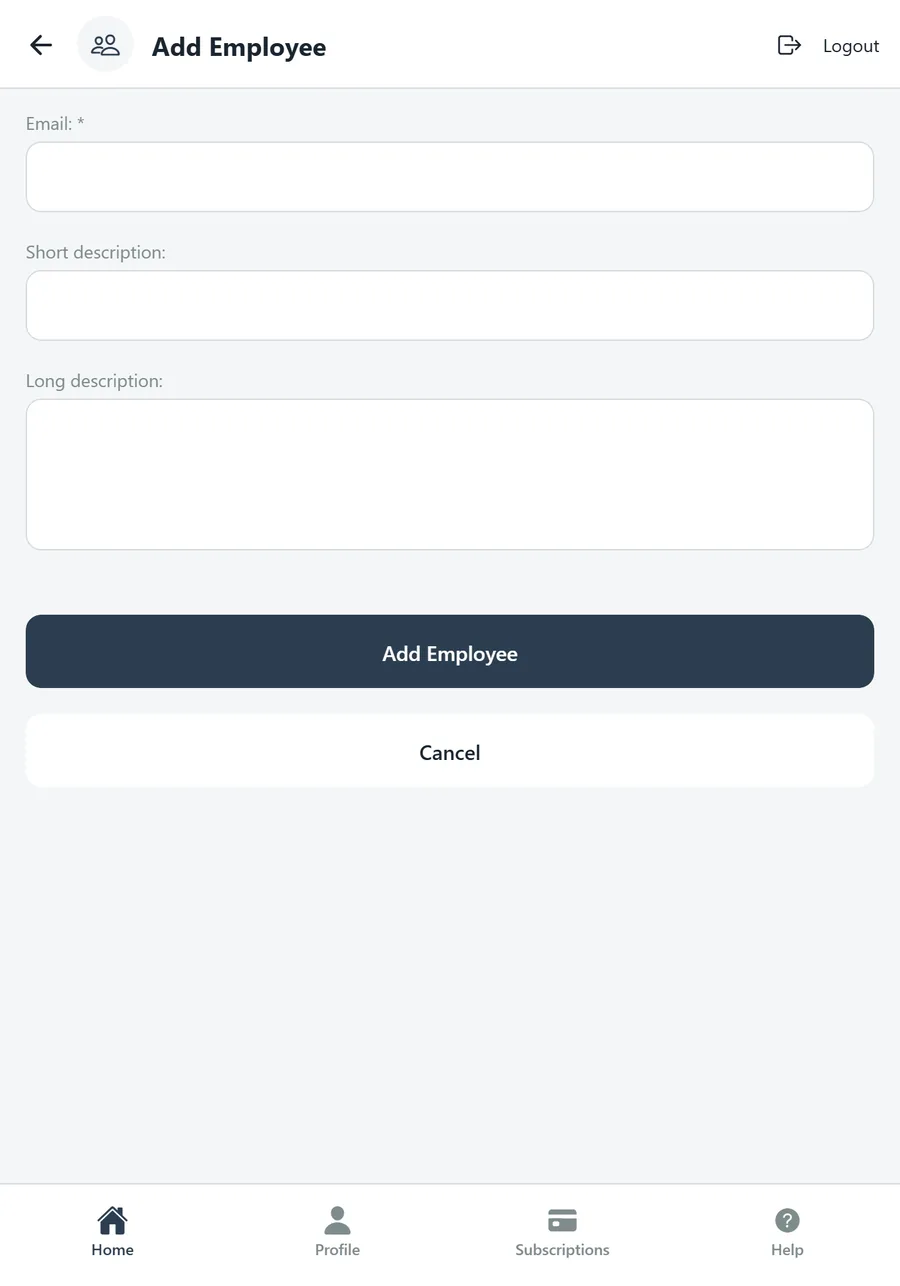
- Add new employee / Add new client — both ask for the person's Email (required) plus a short and long description. The invitation goes to that email; if they already use Schedule Space they are linked straight away.
- Person card — tap to open the management screen for that person.
Manage Employee / Manage Client
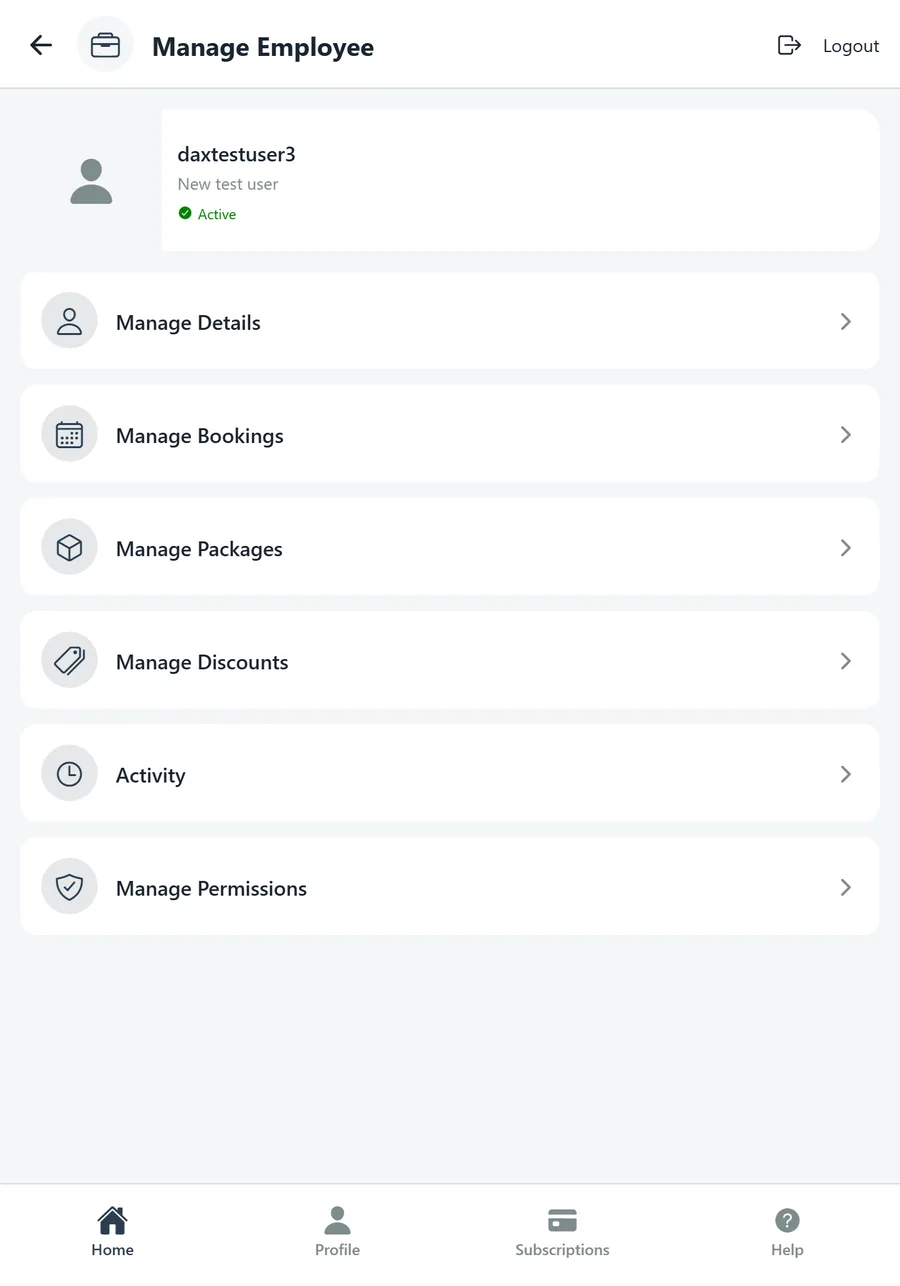
A menu of everything you can do for one person.
- Manage Details — their name, email, descriptions, gender, date of birth, address, phone, images and Active status.
- Manage Bookings — the Bookings calendar filtered to this person, with the same service and resource filters and a New Booking button to book on their behalf.
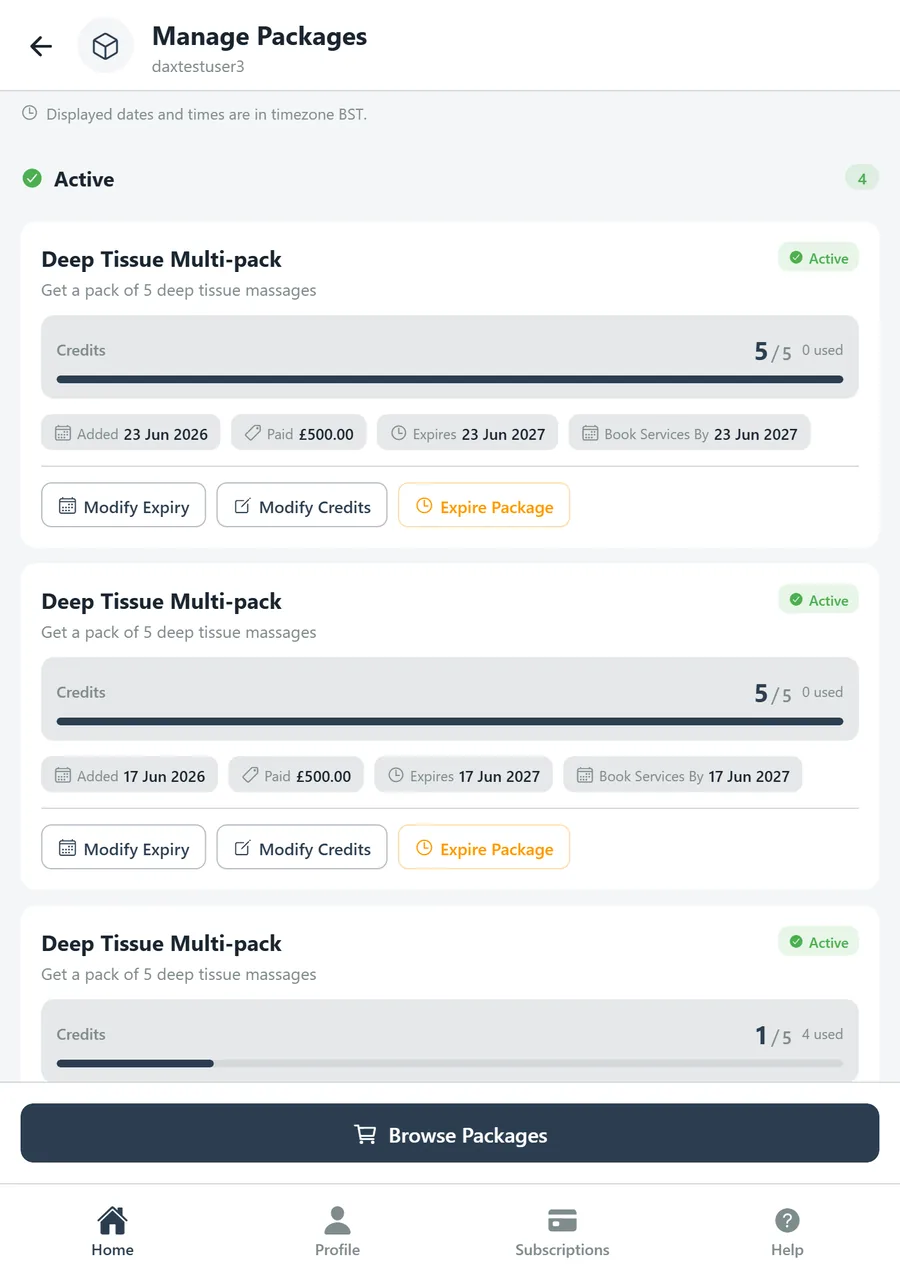
- Manage Packages — every package they hold: credits used and remaining, what they paid, when it expires and the date services must be booked by. Modify Expiry and Modify Credits adjust a pack; Expire Package ends it; Browse Packages adds a new one.
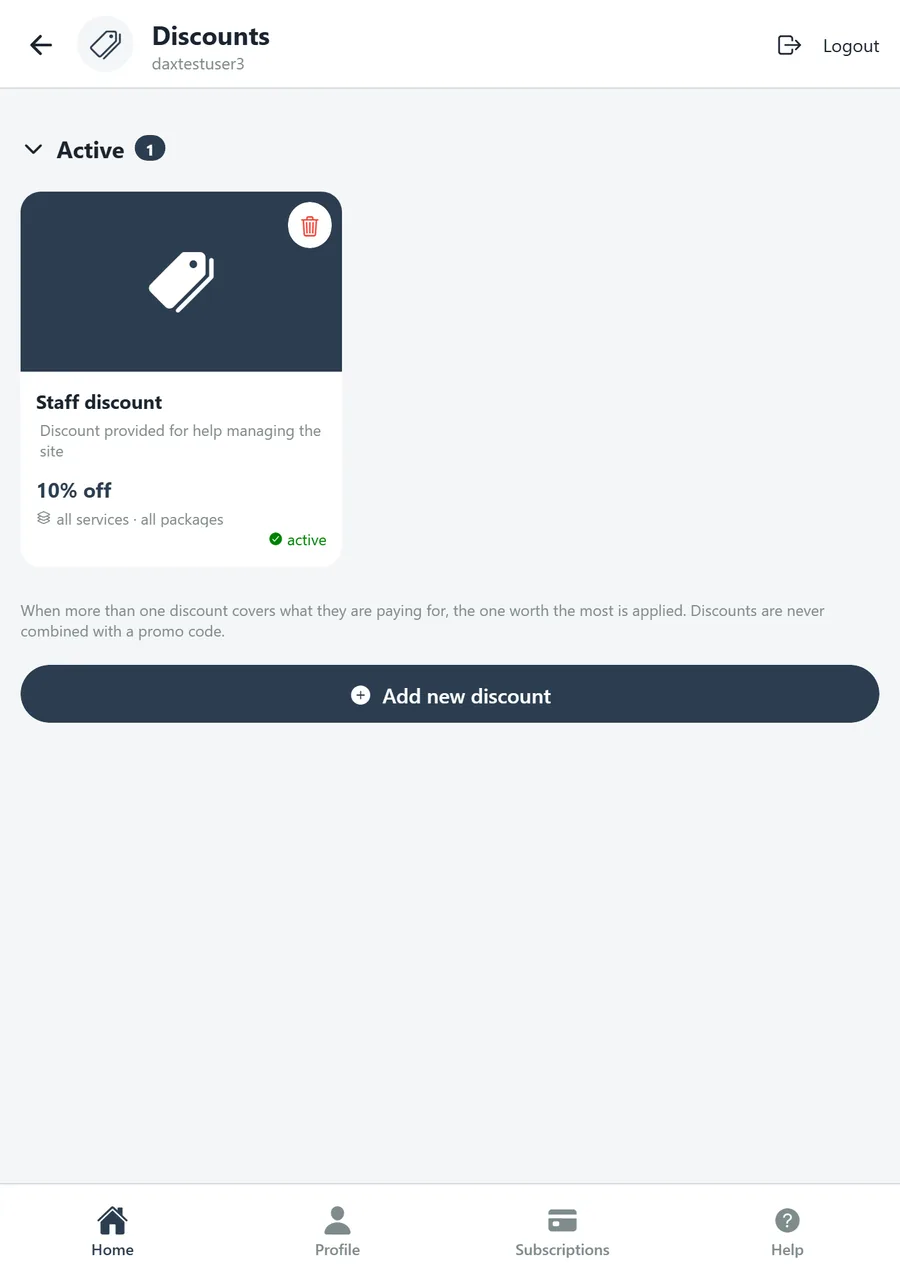
- Manage Discounts — standing discounts for this person, such as a staff rate. Where more than one discount covers what they are paying for, the one worth the most applies; discounts are never combined with a promo code.
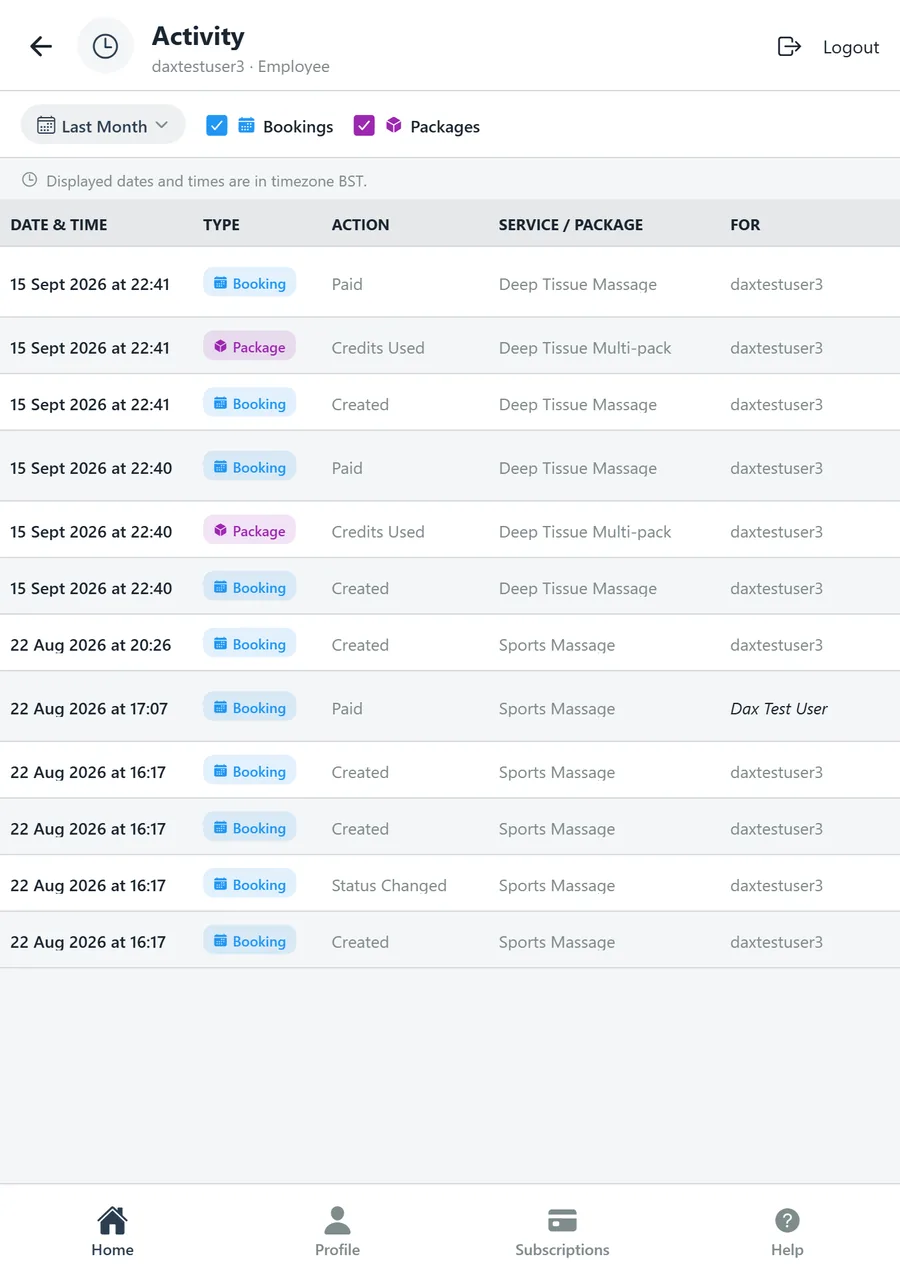
- Activity — a dated log of bookings created, paid, changed and cancelled, and package credits used, with who performed each action. Filter by period and by Bookings or Packages.
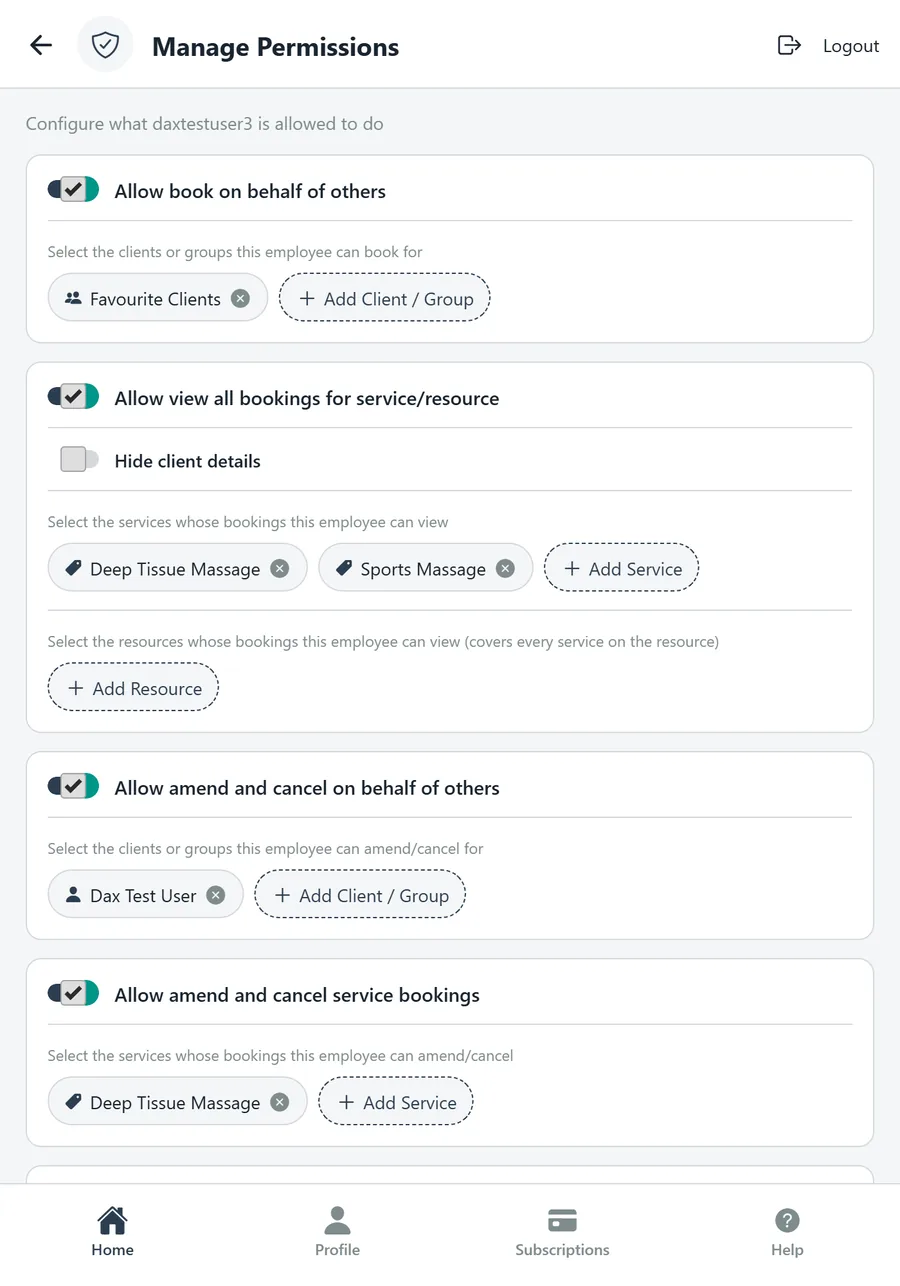
- Manage Permissions (employees) — what this employee may do in your business.
Add Discount
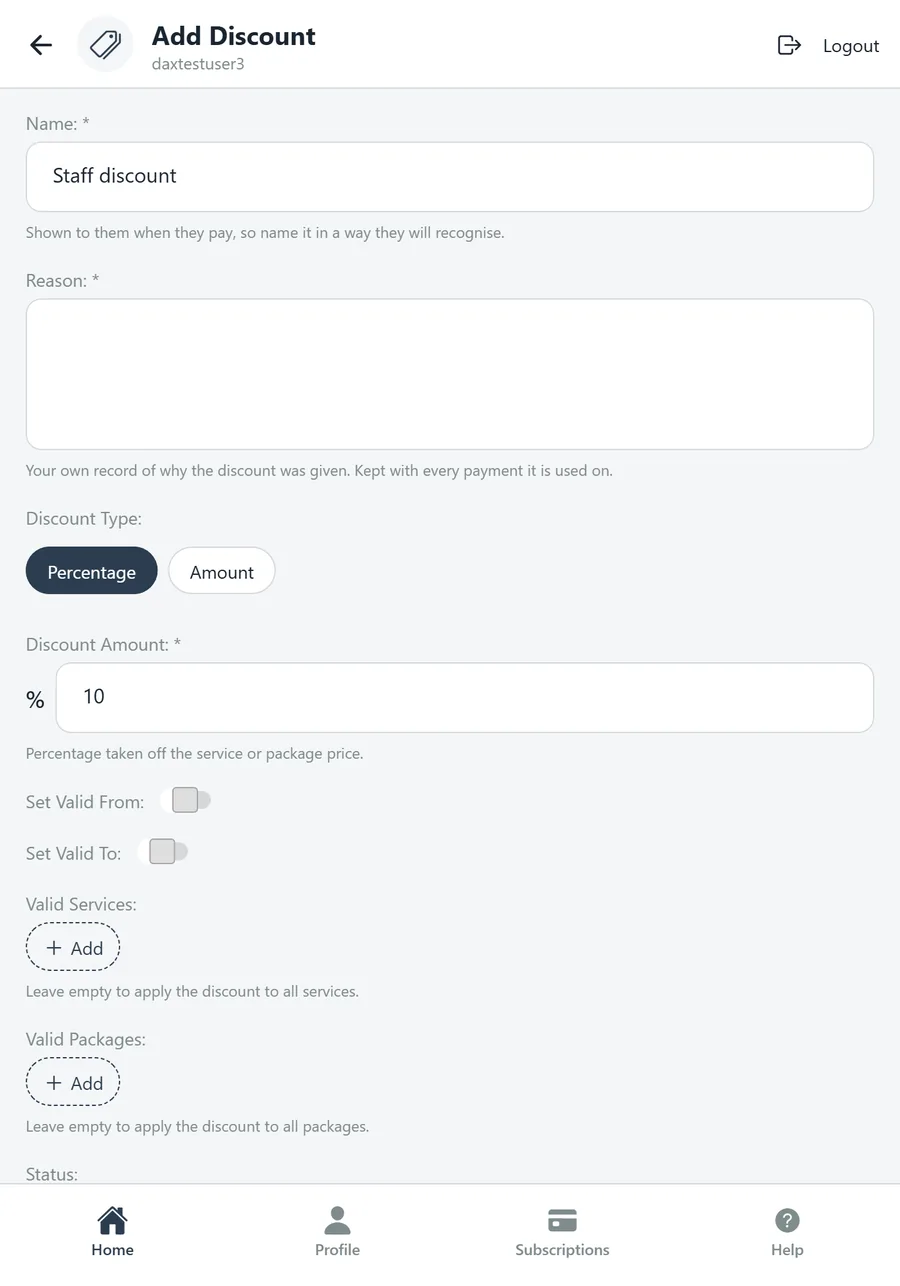
- Name — shown to the person when they pay, so name it in a way they will recognise. Reason — your own record, kept with every payment the discount is used on.
- Discount Type — Percentage or Amount, and the Discount Amount.
- Set Valid From / Set Valid To — optional date limits.
- Valid Services and Valid Packages — leave empty to apply to everything, or add the ones it covers.
- Status — Active or Inactive.
Manage Permissions
- Allow book on behalf of others — and which clients or groups they can book for.
- Allow view all bookings for service/resource — which services' and resources' bookings they can see. Hide client details shows them the calendar without names and contact details.
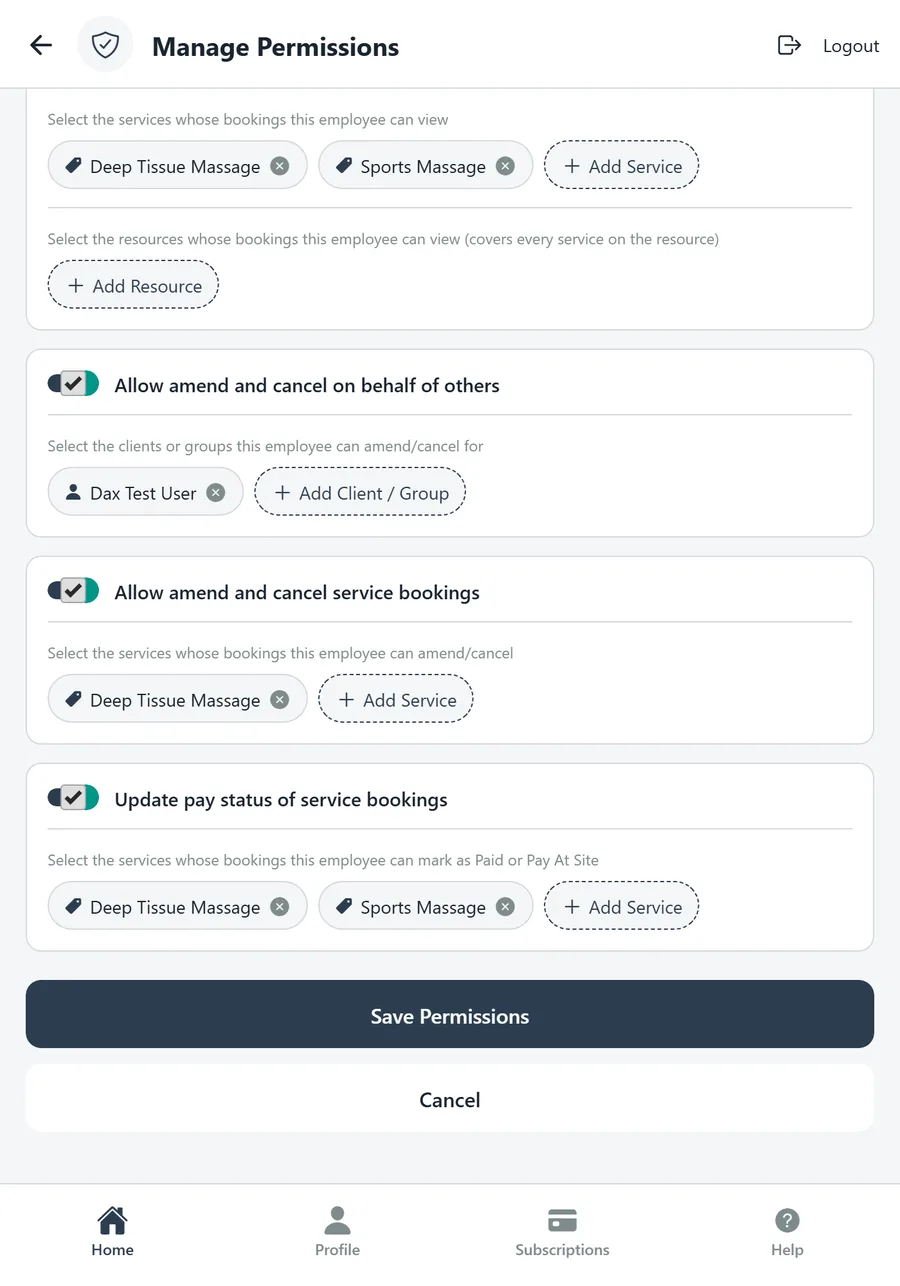
- Allow amend and cancel on behalf of others — which clients or groups they can change bookings for.
- Allow amend and cancel service bookings — which services' bookings they can change.
- Update pay status of service bookings — which services they can mark as Paid or Pay At Site.
Groups
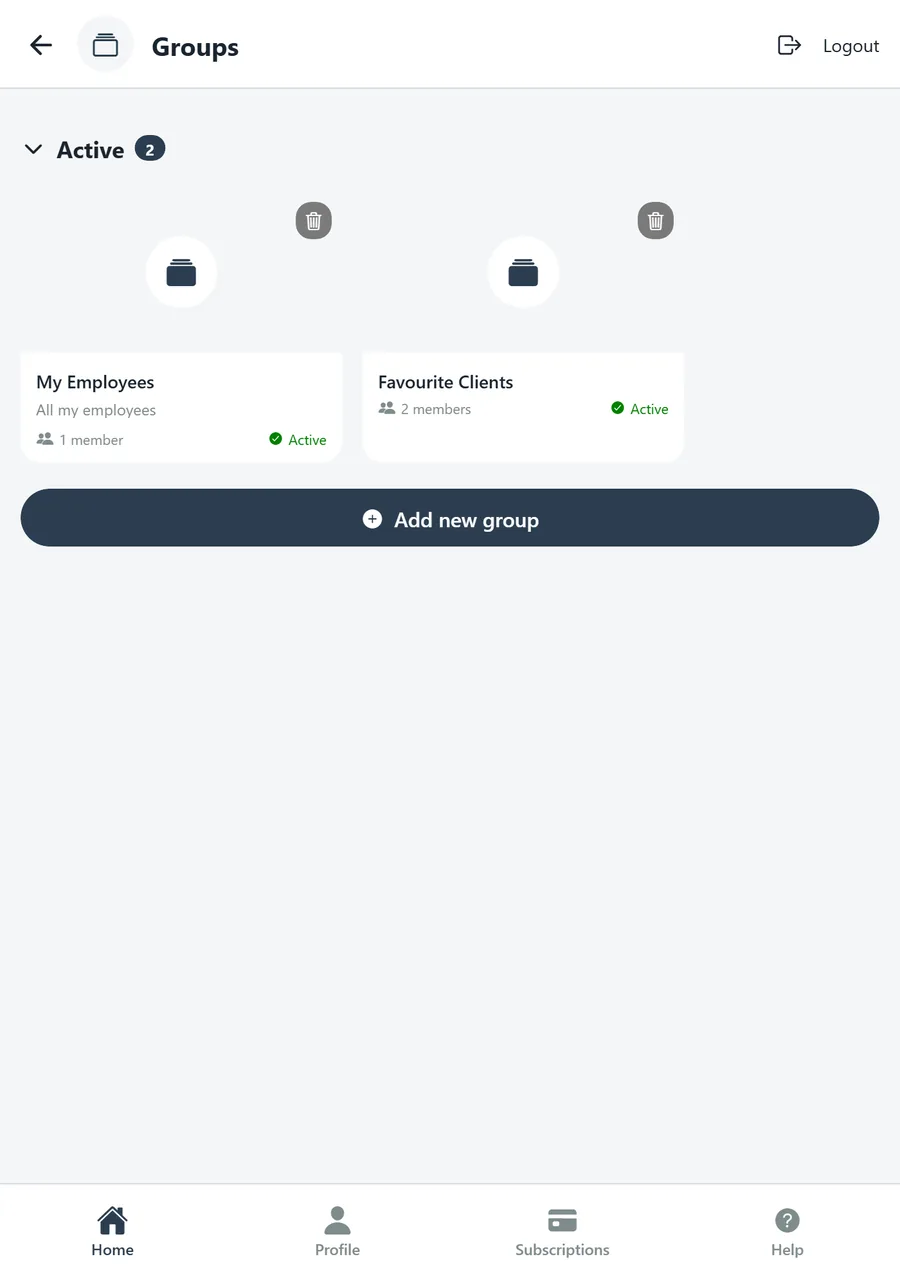
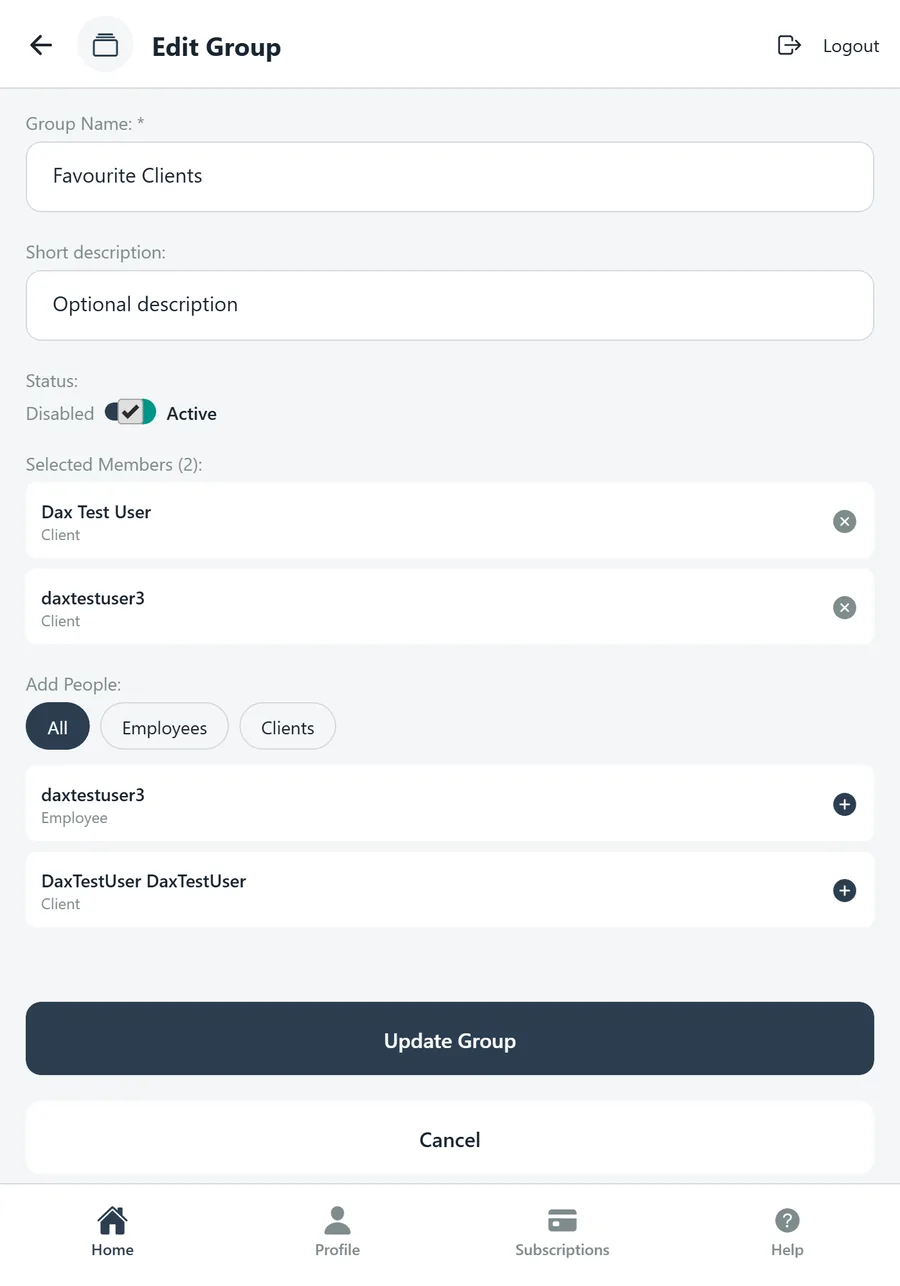
Groups collect employees and clients so you can point at them in one go: restrict a service to a group, give an employee permission to book for a group, or offer a promo code to a group.
- Groups list — each card shows the description, member count and status; the bin icon deletes a group.
- Group Name (required) and Short description.
- Status — Active or Disabled.
- Selected Members — who is in the group; tap the cross to remove someone.
- Add People — everyone not yet in the group, filtered by All, Employees or Clients; tap the plus to add.
Packages
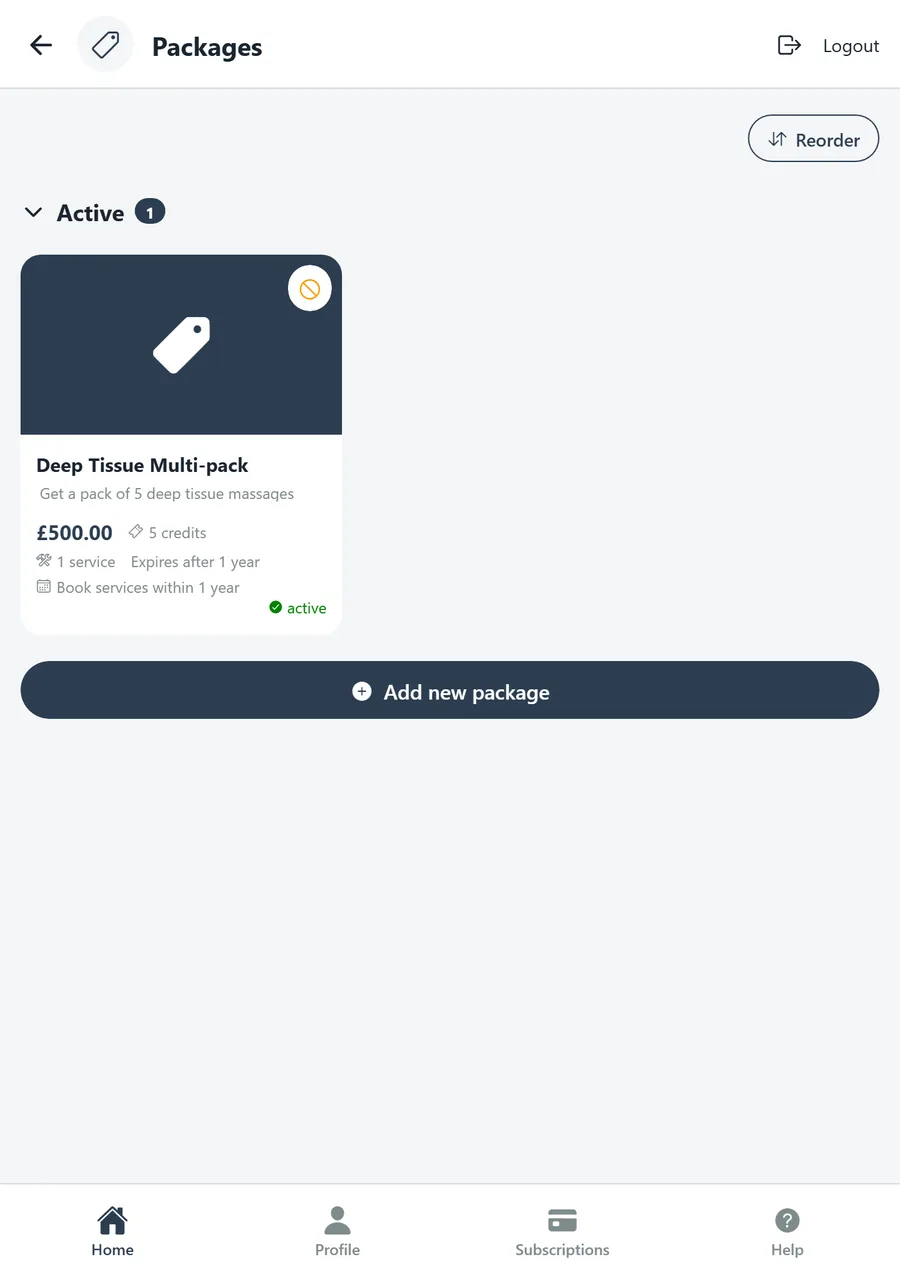
A package is a bundle of credits a client buys up front and spends on services, for example five deep-tissue massages for £500. Services paid with Package Credits (Step 4) can only be booked against a package.
- Packages list — price, credits, how many services it covers, expiry and booking window, and status. Reorder sets the order clients see.
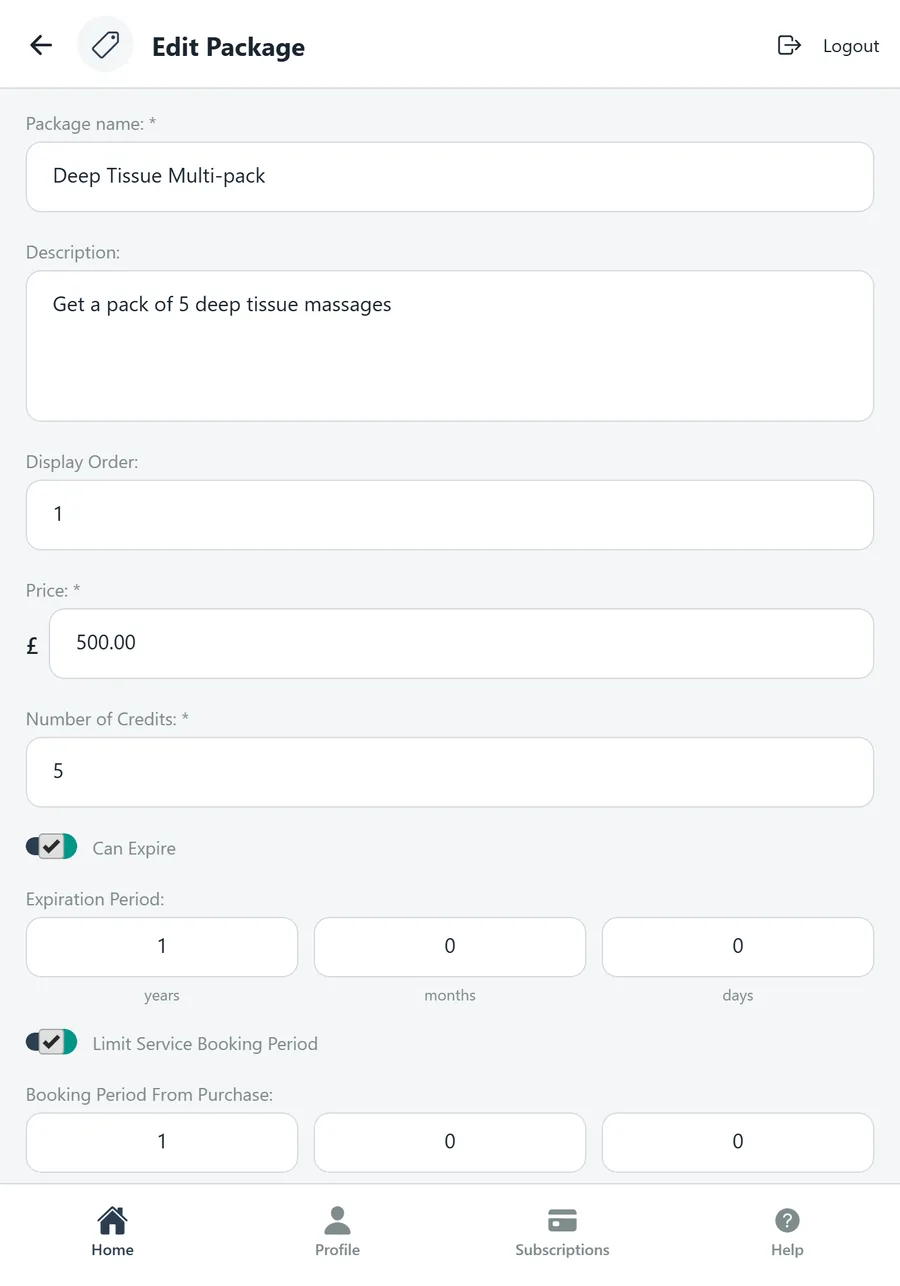
- Package name (required), Description and Display Order.
- Price (required) and Number of Credits (required) — what the client pays and how many credits they receive.
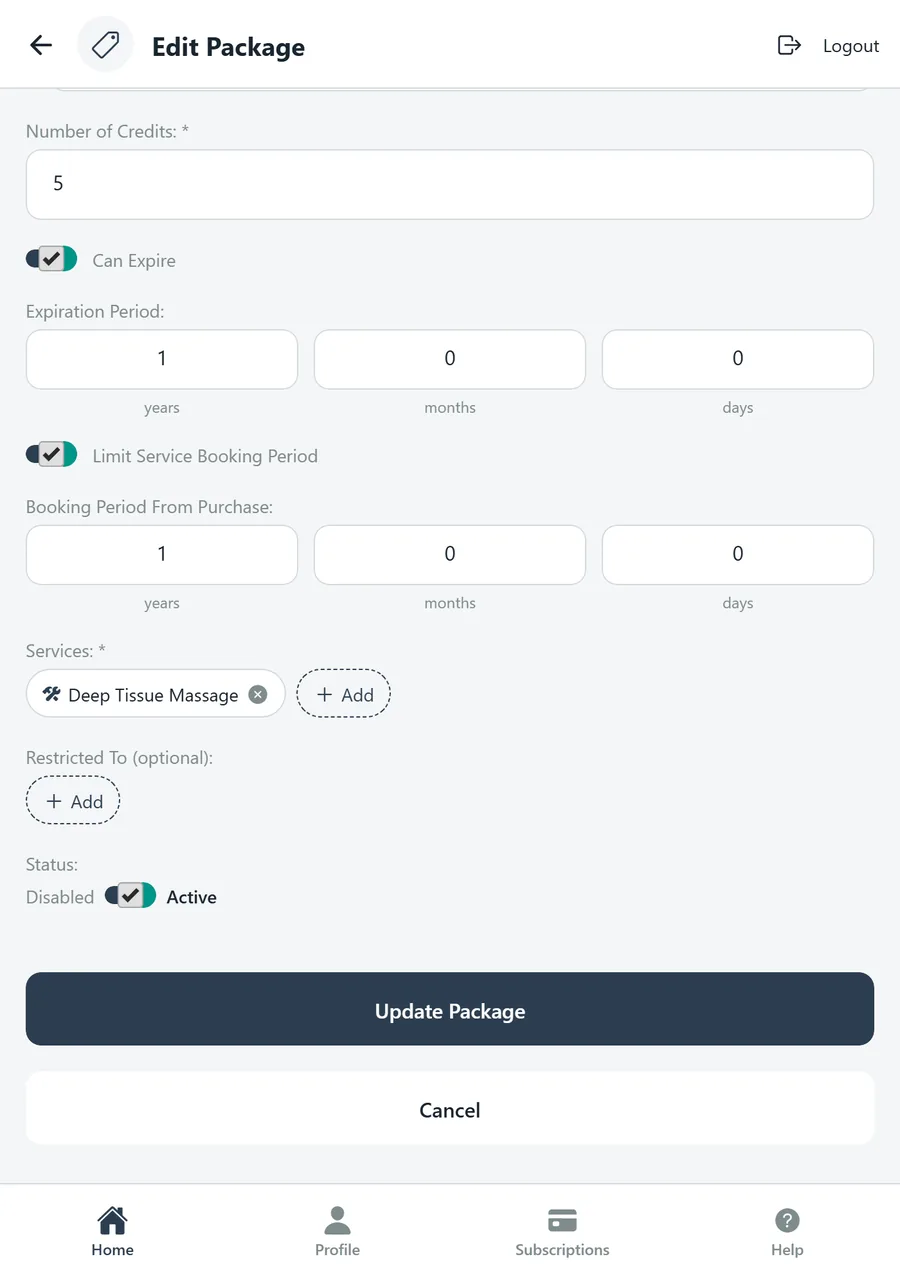
- Can Expire — switch on to set an Expiration Period (years, months, days) after which unused credits lapse.
- Limit Service Booking Period — switch on to set a Booking Period From Purchase, the window in which services must be booked.
- Services (required) — which services the credits can be spent on.
- Restricted To (optional) — only these clients or groups can buy it.
- Status — Active or Disabled.
Promo Codes
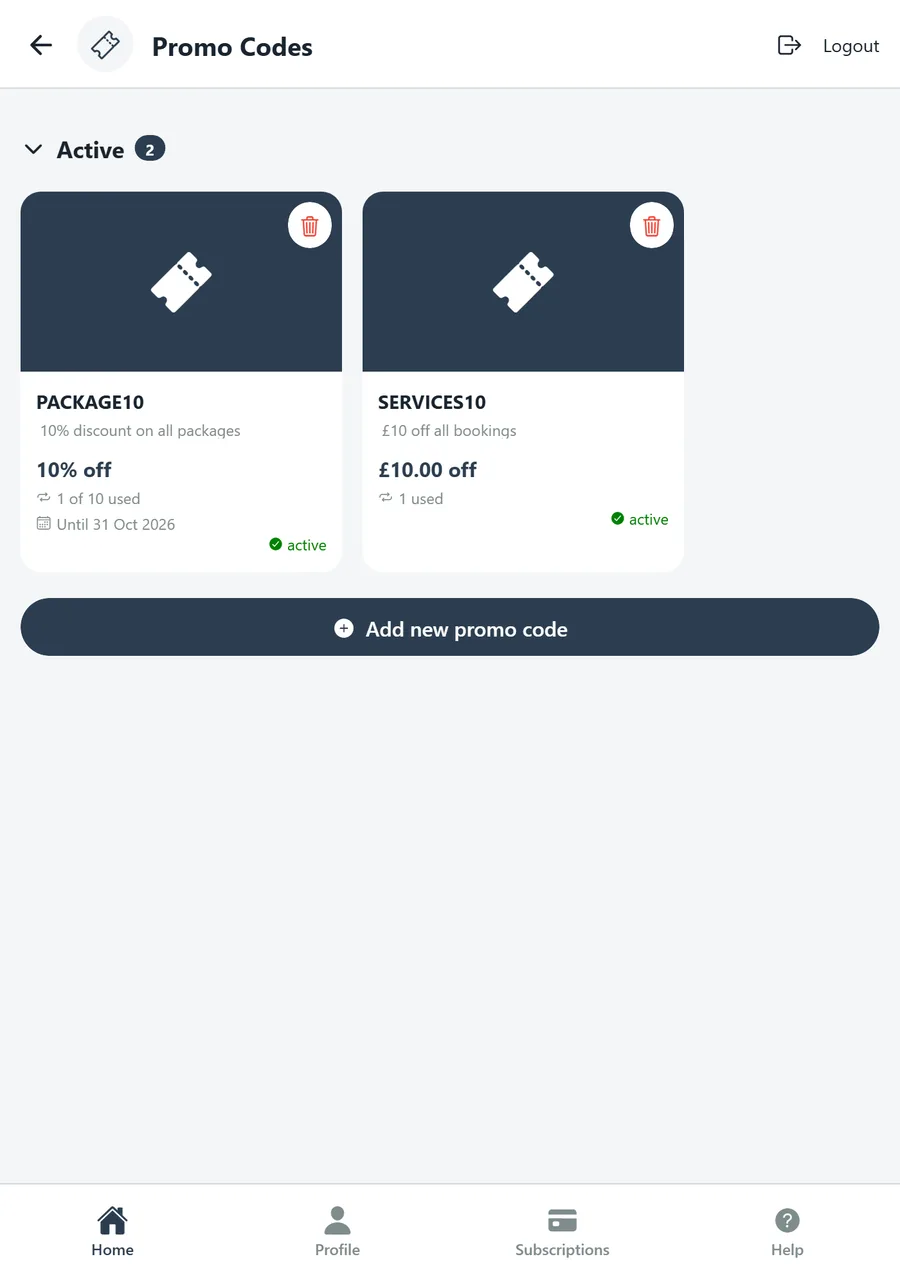
Codes clients enter when they pay for a service or package. Use them for launch offers, referrals or a discount for one group of clients.
- Promo Codes list — the code, what it takes off, how many times it has been used (against a limit if there is one), when it runs out, and status. The bin icon deletes a code.
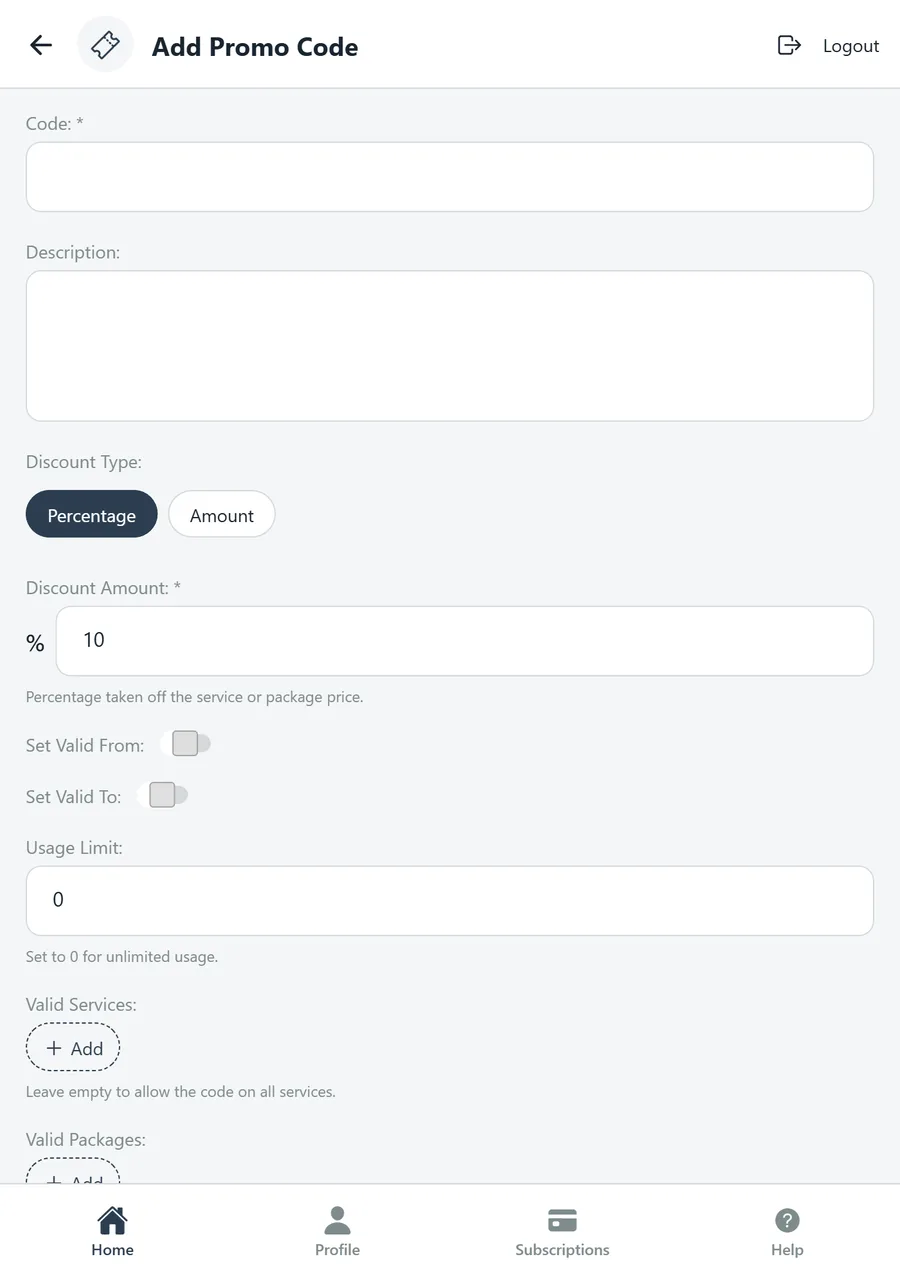
- Code (required) — what the client types, for example WELCOME10. Description — for your own reference.
- Discount Type — Percentage or Amount, and the Discount Amount.
- Set Valid From / Set Valid To — optional dates the code works between.
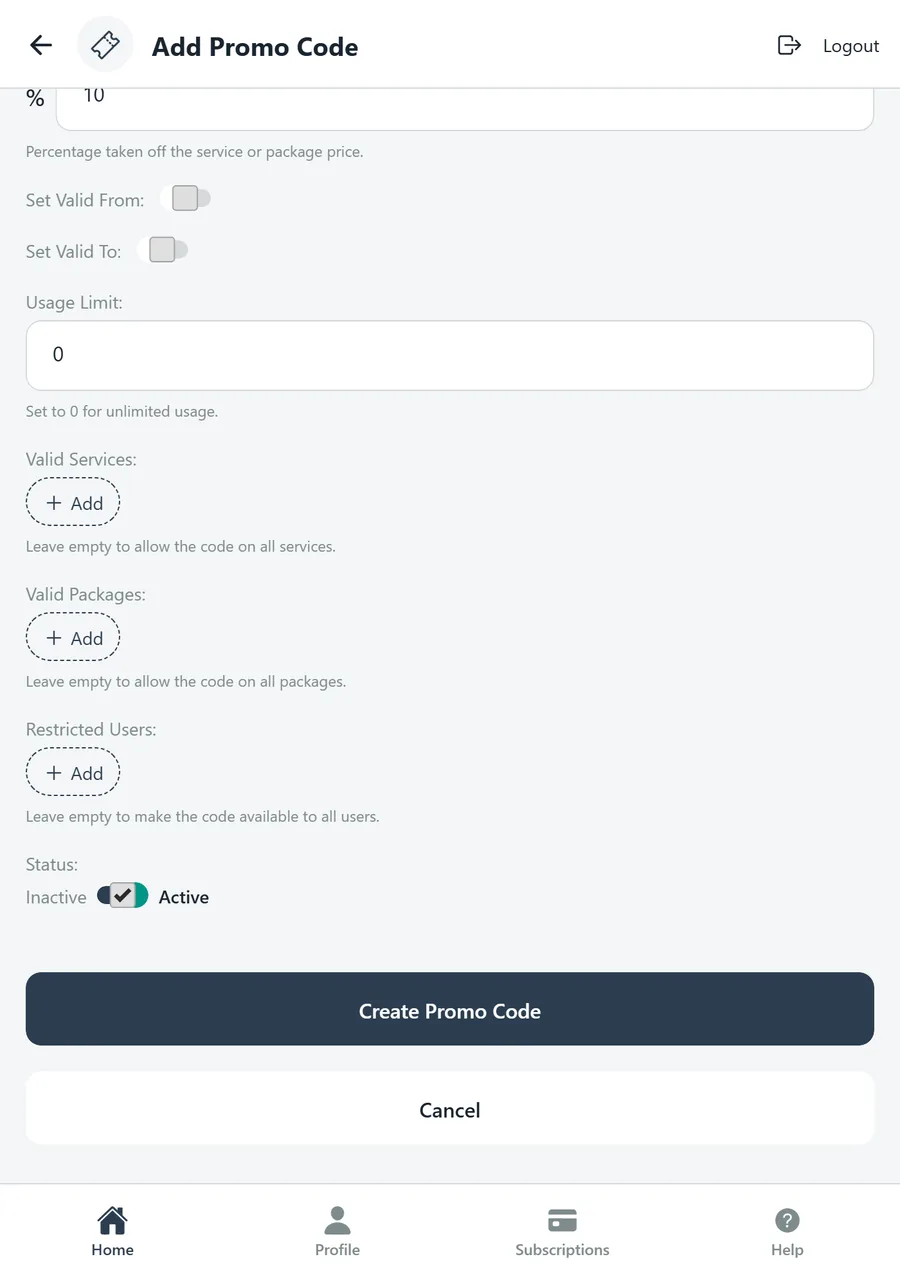
- Usage Limit — the total number of times the code can be used; 0 means unlimited.
- Valid Services, Valid Packages — leave empty to allow the code on everything.
- Restricted Users — leave empty to make the code available to all users, or limit it to chosen clients or groups.
- Status — Active or Inactive.
Bookings
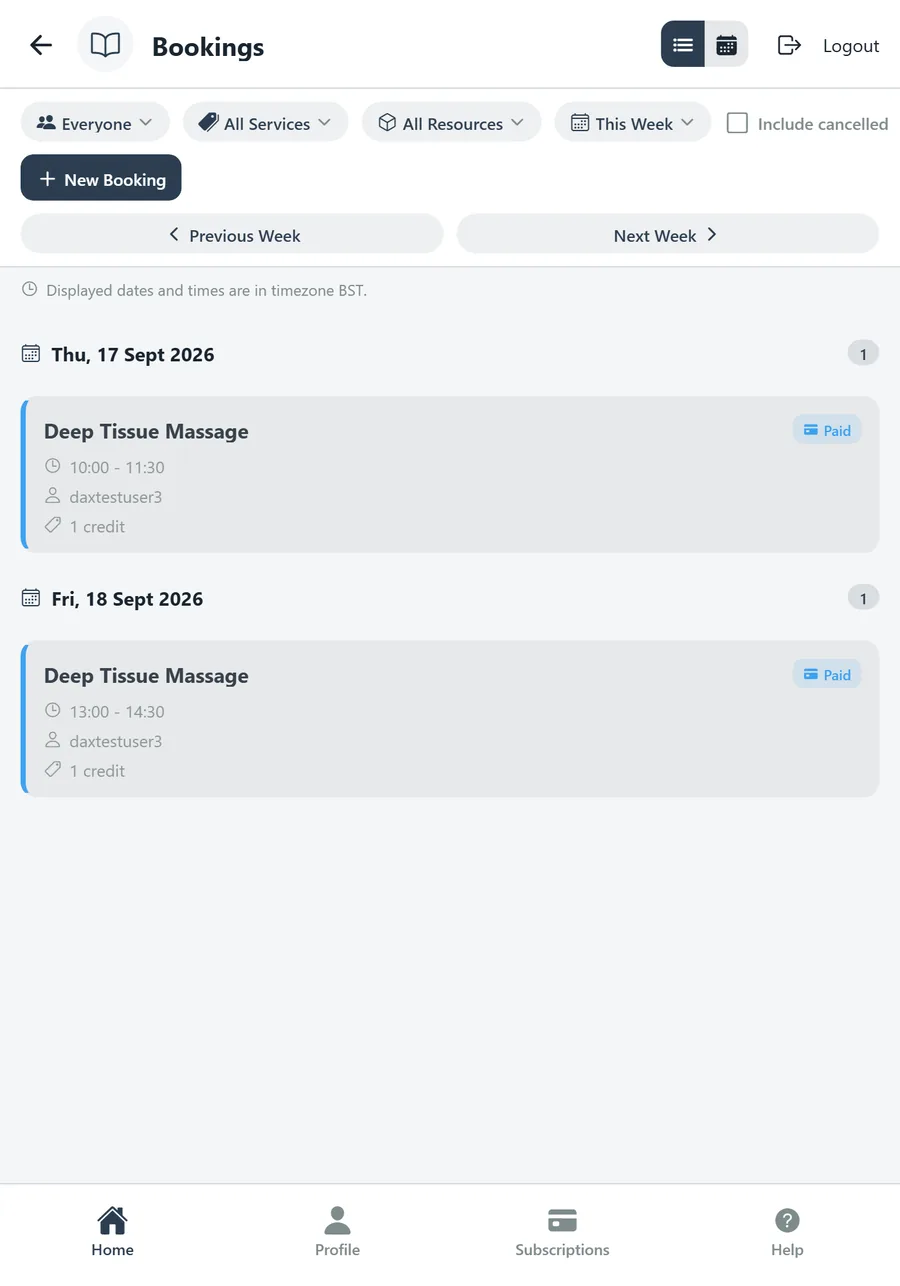
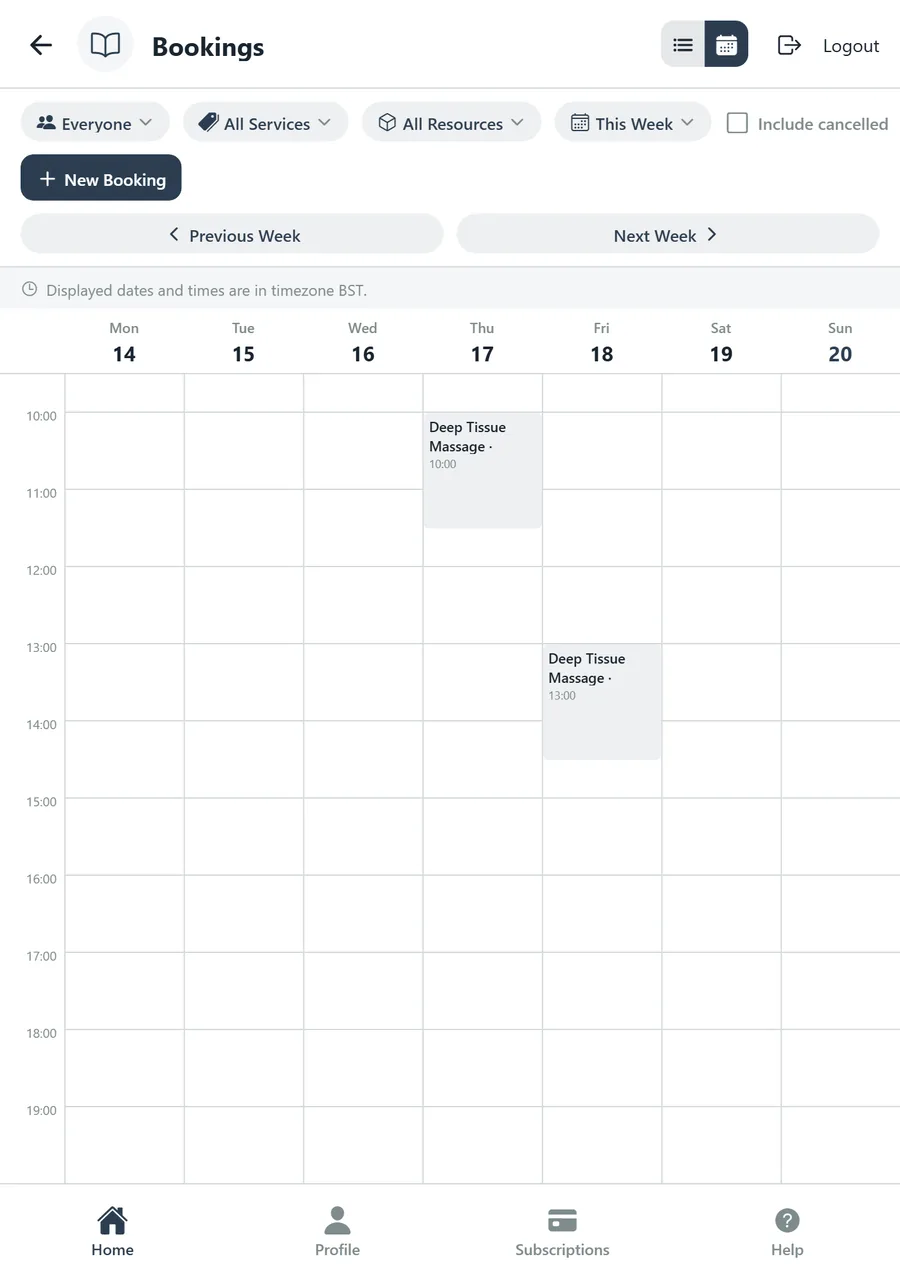
The calendar you will live in. Switch between a list grouped by day and a week grid, filter it, step between weeks, and open any booking to see or change it.
- List / calendar toggle (top right) — the list shows each booking with its time, client and payment status; the calendar plots them on a seven-day grid, one column per day.
- Filters — Everyone (or chosen people), All Services, All Resources and the period (This Week by default). Include cancelled shows cancelled bookings too.
- Previous Week / Next Week — move through the calendar. The header states the timezone bookings are shown in.
- New Booking — book on behalf of a client (see below).
- Payment badge — Paid, Pay At Site, or the number of package credits used.
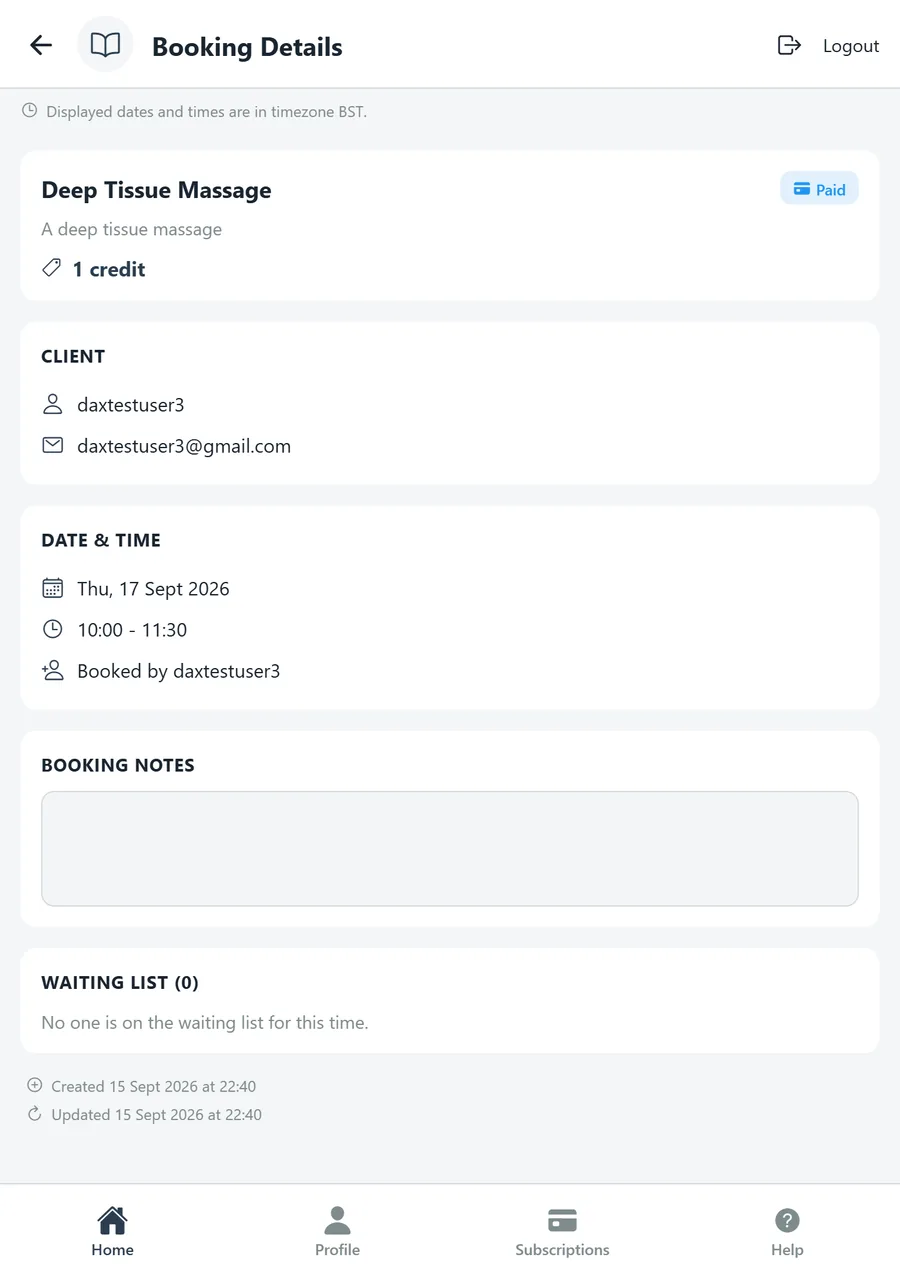
Booking Details
- Service — name, description, price or credits, and the payment badge.
- Client — name and email. Date & Time — the slot and who made the booking.
- Booking Notes — anything the client wrote when booking, and your replies.
- Waiting List — who is queued for this slot on a class or a full service.
- Created and updated timestamps, plus amend, cancel and refund actions where your permissions allow.
New Booking
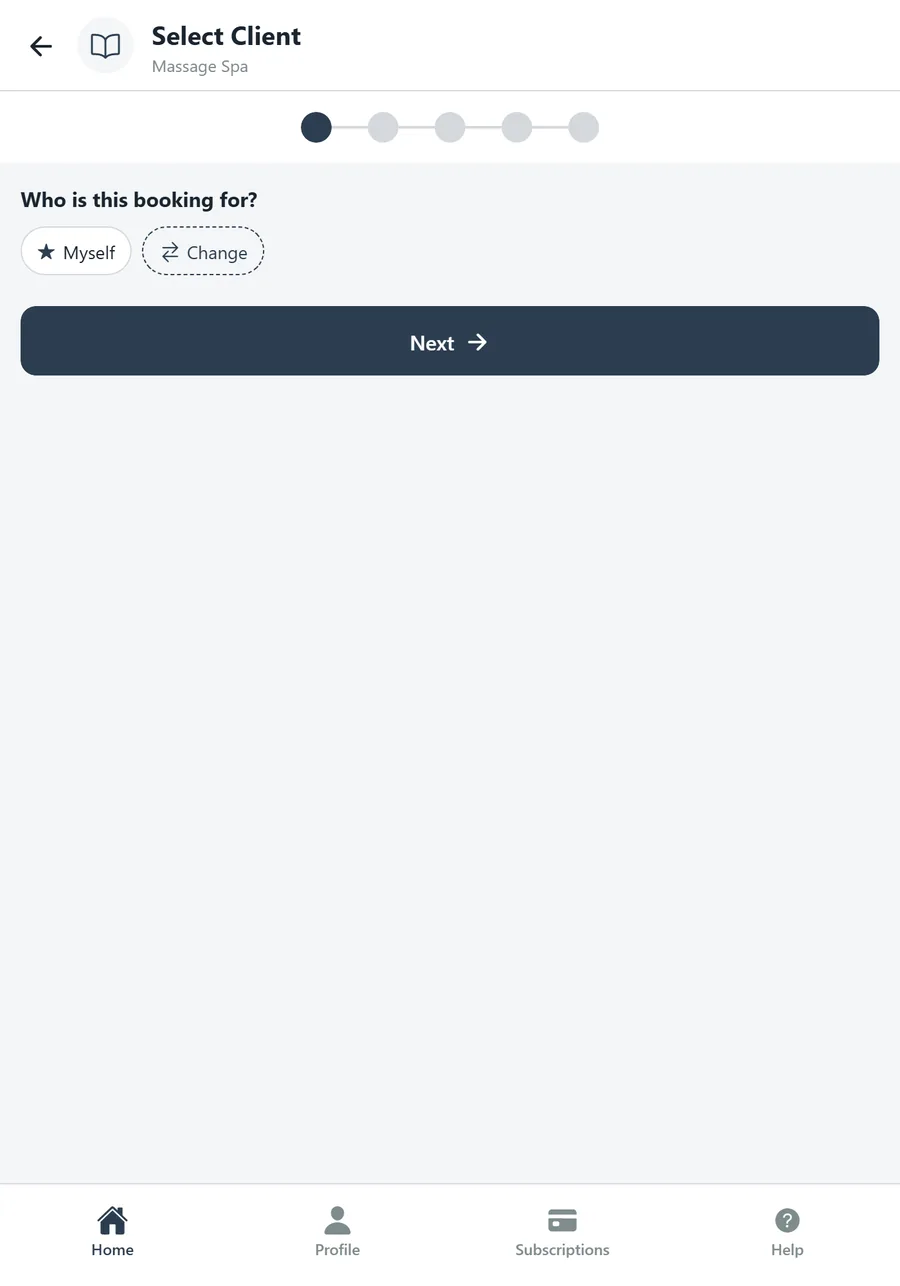
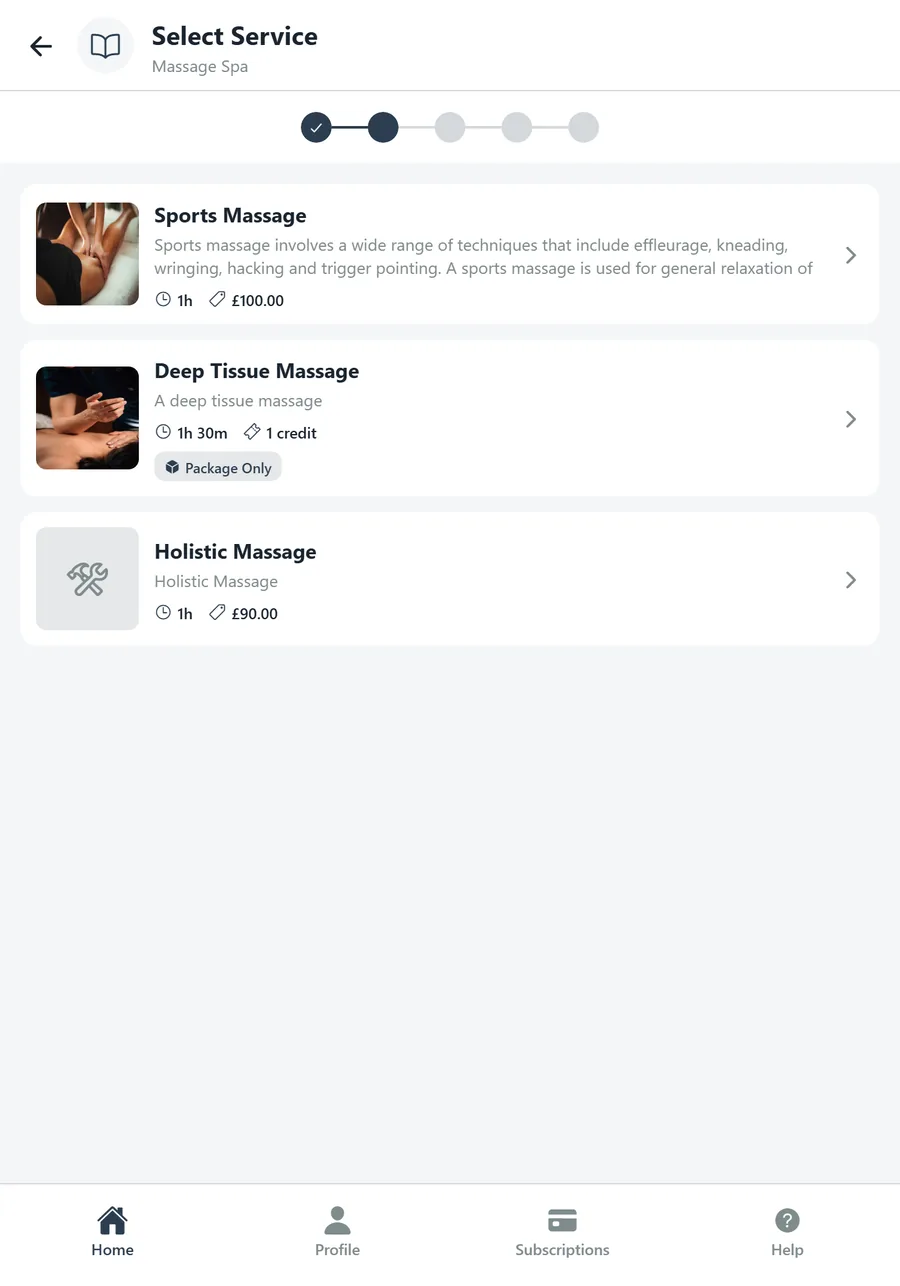
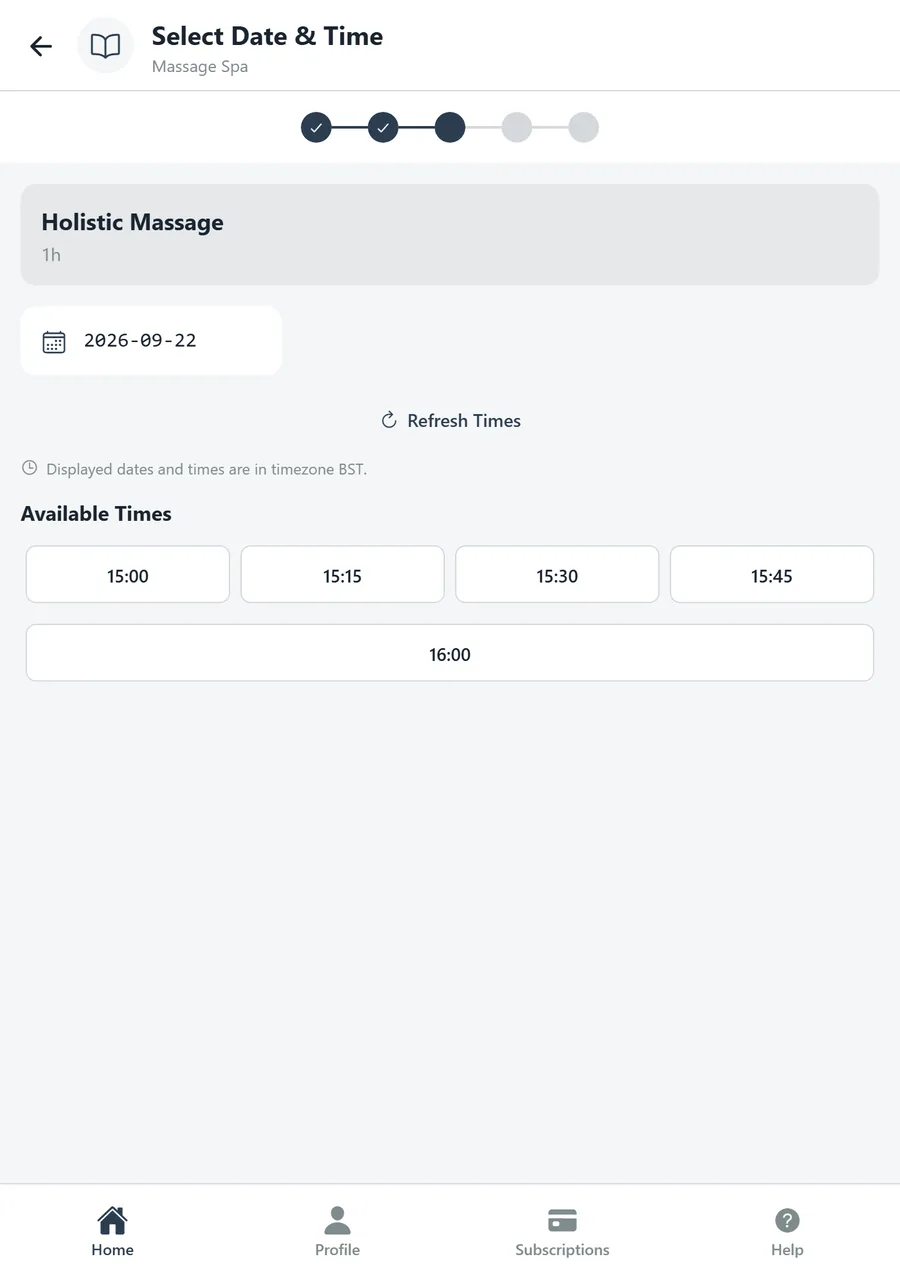
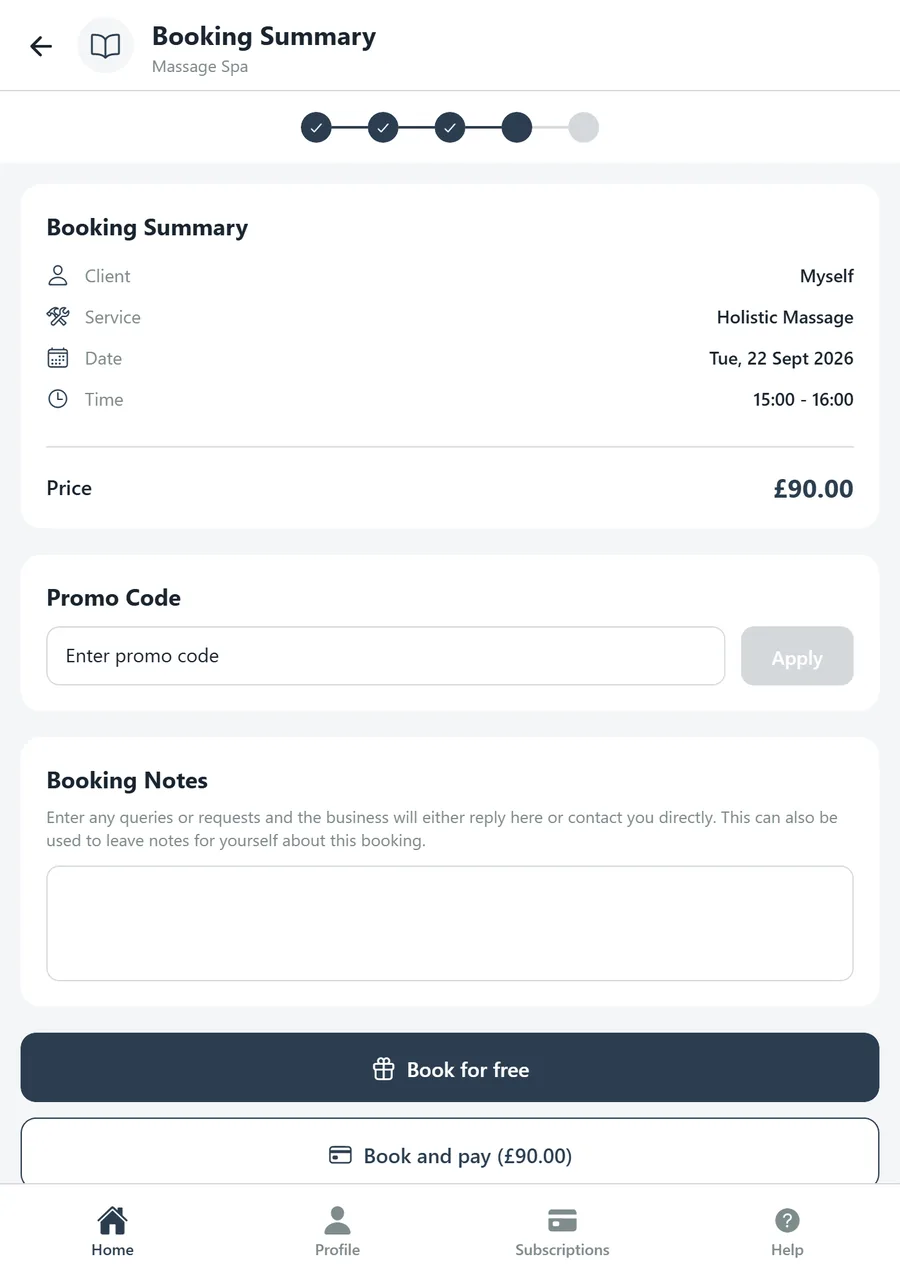
A short wizard; the dots along the top show where you are.
- Select Client — Myself, or Change to pick a client.
- Select Service — every active service with its duration and price, or the credits it costs. Package-only services are marked.
- Select Date & Time — choose a date; the available start times for that service and its resources appear as buttons. Refresh Times re-checks availability.
- Booking Summary — client, service, date, time and price; an optional Promo Code; and Booking Notes for queries or requests. Finish with Book and pay, or Book for free where you are booking on the client's behalf and taking payment another way.
Profile, Subscriptions and Help
The three other tabs on the bottom bar belong to your account rather than to one business.
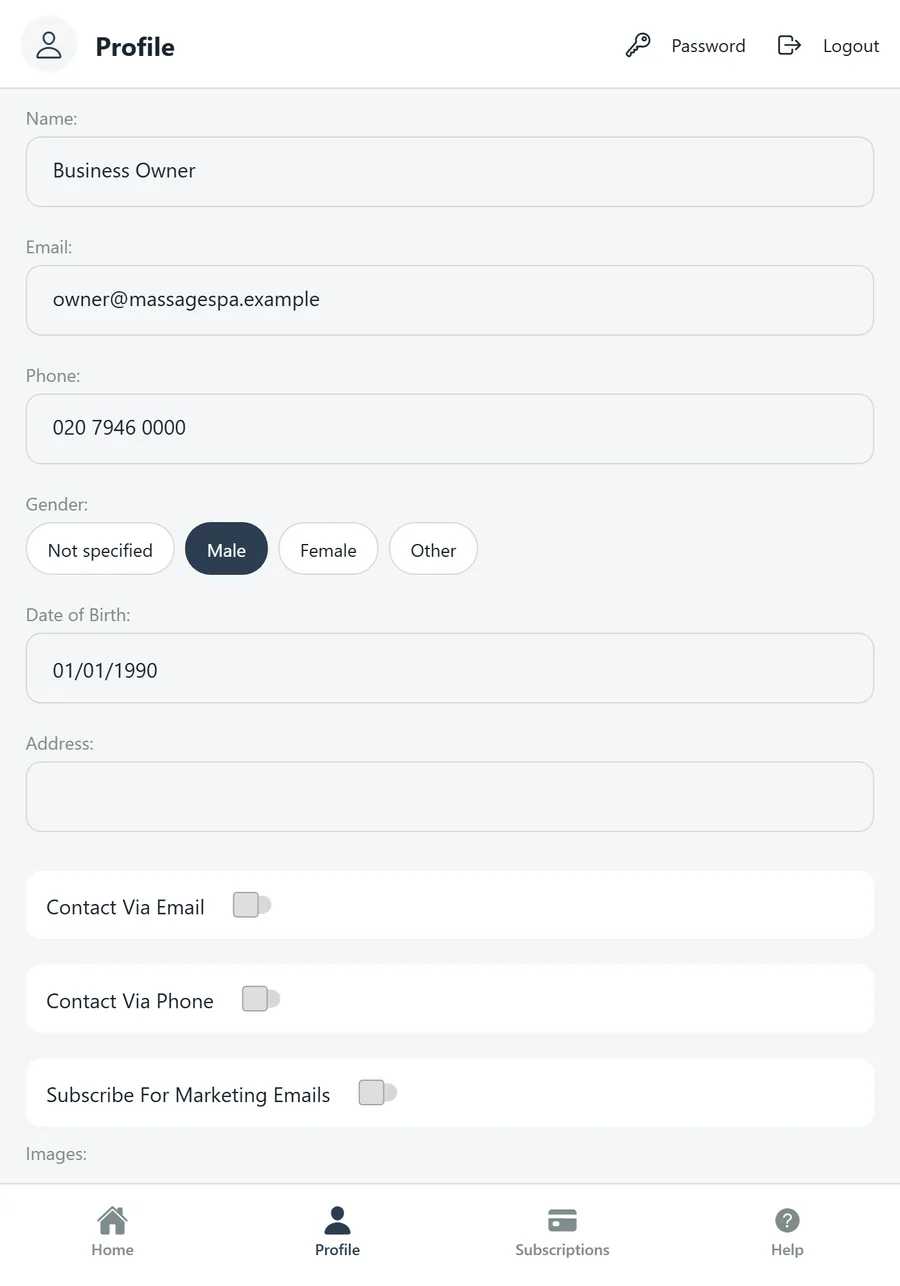
- Profile — your own name, email, phone, gender, date of birth and address; switches for Contact Via Email, Contact Via Phone and Subscribe For Marketing Emails; your images; and the date you joined. Edit Profile unlocks the fields, and Password (top right) changes your password.
- Subscriptions — your subscription status, the plan and price, the trial end or next billing date, with Start Free Trial before you subscribe and Manage Subscription afterwards.
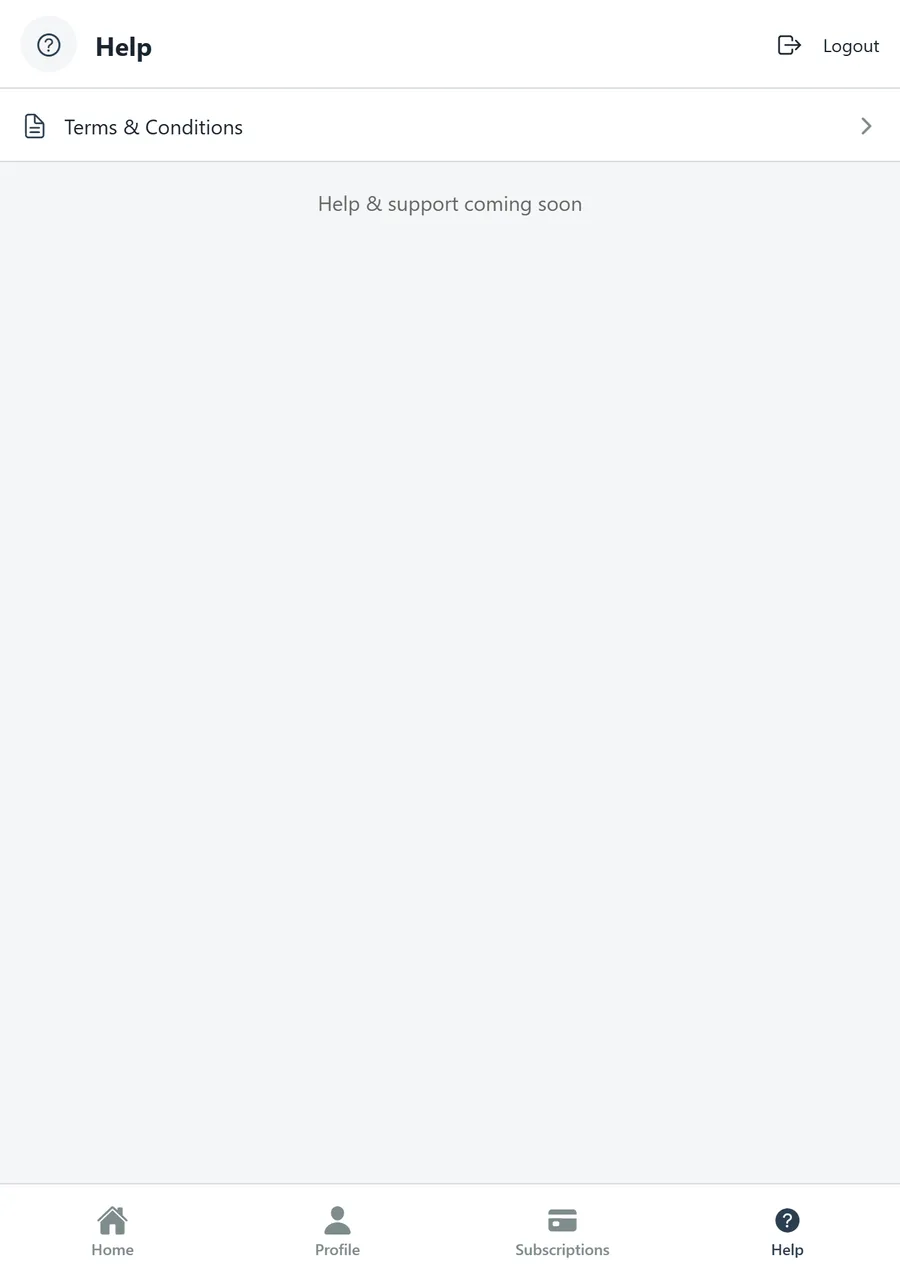
- Help — the Terms & Conditions, with help and support to follow.